Cert. Manager
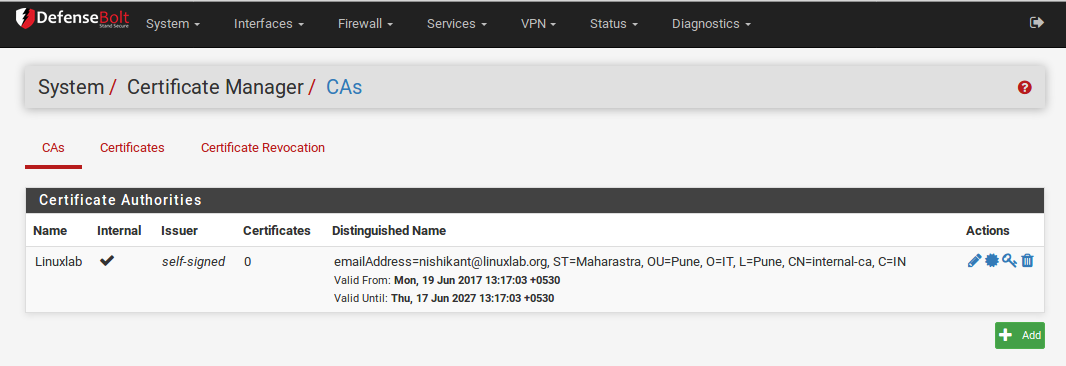
Certificate Authorities (CAs) are managed from System > Cert Manager, on the CAs tab. From this screen CAs may be added, edited, exported, or deleted.
1) CAs
Create a new Certificate Authority
To create a new CA, start the process as follows: - Navigate to System > Cert Manager on the CAs tab.
- Click Add to create a new CA.
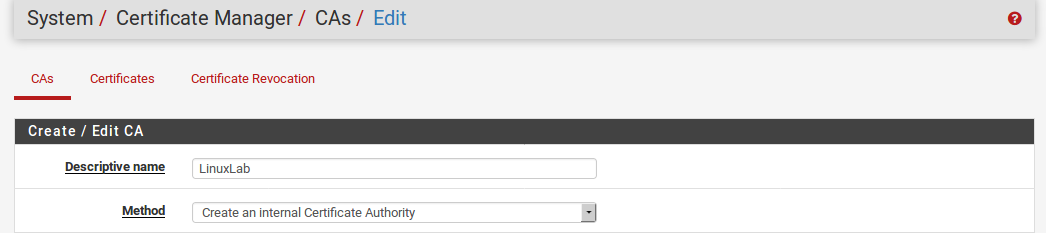
-Enter a Descriptive name for the CA. This is used as a label for this CA throughout the GUI.
- Select the Method that best suits how the CA will be generated. These options and further instructions are in the corresponding sections below:
- Create an Internal Certificate Authority
- Import an Existing Certificate Authority
- Create an Intermediate Certificate Authority
1) Create an Internal Certificate Authority
The most common Method used from here is to Create an Internal Certificate Authority. This will make a new root CA based on information entered on this page.
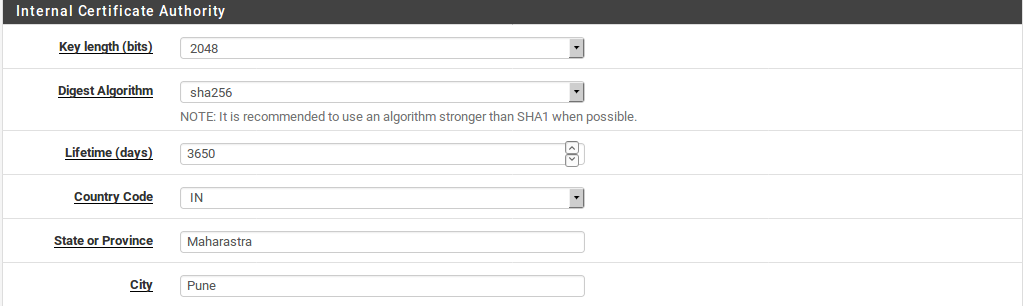
- Select the Key length to choose how “strong” the CA is in terms of encryption. The longer the key, the more secure it is. However, longer keys can take more CPU time to process, so it isn’t always wise to use the maximum value. The default value of 2048 is a good balance.
- Select a Digest Algorithm from the supplied list. The current best practice is to use an algorithm stronger than SHA1 where possible. SHA256 is a good choice.
Note
Some older or less sophisticated equipment, such as VPN-enabled VoIP handsets may only support SHA1 for the Digest Algorithm. Consult device documentation for specifics.
- Enter a value for Lifetime to specify the number of days for which the CA will be valid. The duration depends on personal preferences and site policies. Changing the CA frequently is more secure, but it is also a management headache as it would require reissuing new certificates when the CA expires. By default the GUI suggests using 3650 days, which is approximately 10 years.
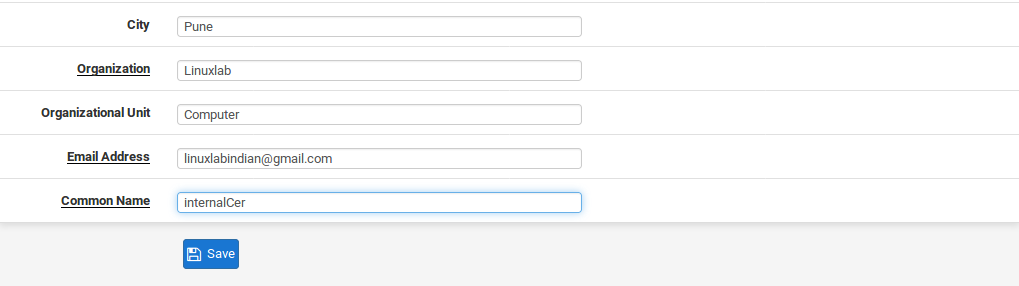
- Enter values for the Distinguished name section for personalized parameters in the CA. These are typically filled in with an organization’s information, or in the case of an individual, personal information. This information is mostly cosmetic,and used to verify the accuracy of the CA, and to distinguish one CA from another. Punctuation and special characters must not be used.
- Select the Country Code from the list. This is the ISO-recognized country code, not a hostname top-level domain.
- Enter the State or Province fully spelled out, not abbreviated.
- Enter the City.
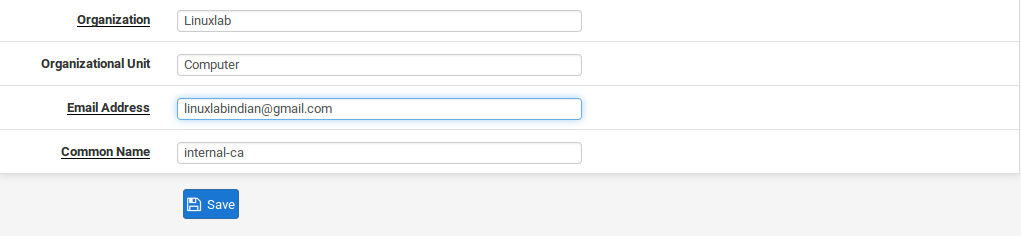
- Enter the Organization name, typically the company name.
- Enter a valid Email Address.
- Enter the Common Name (CN). This field is the internal name that identifies the CA. Unlike a certificate, the CN for a CA does not need to be the hostname, or anything specific. For instance, it could be called VPNCA or MyCA.
Note
Although it is technically valid, avoid using spaces in the CN.
- Click Save
If errors are reported, such as invalid characters or other input problems, they will be described on the screen. Correct the errors, and attempt to Save again.
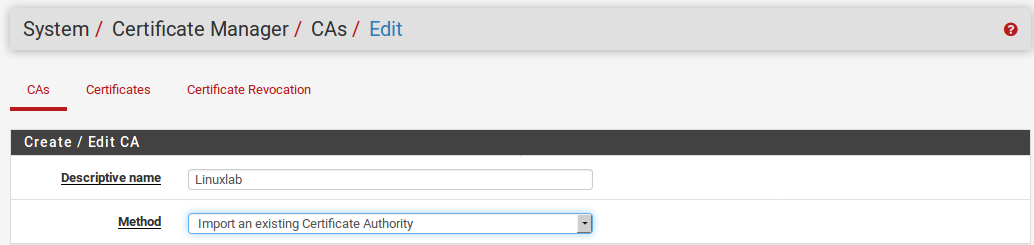
Import an Existing Certificate Authority
If an existing CA from an external source needs to be imported, it can be done by selecting the Method of Import an Existing Certificate Authority. This can be useful in two ways: One, for CAs made using another system, and two, for CAs made by others that must be trusted.
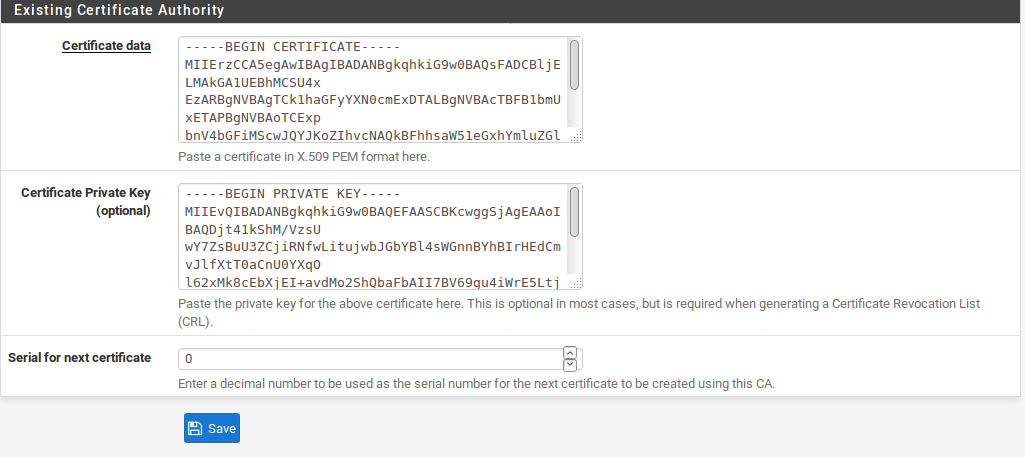
- Enter the Certificate data for the CA. To trust a CA from another source, only the Certificate data for the CA is required. It is typically contained in a file ending with .crt or .pem. It wouldbe plain text, and enclosed in a block such as:
—–BEGIN CERTIFICATE—–
—–END CERTIFICATE—– |
- Enter the Certificate Private Key if importing a custom external CA, or a CA that is capable of generating its own certificates and certificate revocation lists. This is typically in a file ending in .key. It would be plain text data enclosed in a block such as:
—–BEGIN RSA PRIVATE KEY—– [A bunch of random-looking base64-encoded data] —–END RSA PRIVATE KEY—– |
- Enter the Serial for next certificate if theprivate key was entered. This is essential. A CA will create certificates each with a unique serial number in sequence. This value controls what the serial will be for the next certificate generated from this CA. It is essential that each certificate have a unique serial, or there will be problems later with certificate revocation. If the next serial is unknown, attempt to estimate how many certificates have been made from the CA, and then set the number high enough a collision would be unlikely.
- Click Save
If errors are reported, such as invalid characters or other input problems, they will be described on the screen. Correct the errors, and attempt to Save again.
Importing a Chained or Nested Certificate Authority
If the CA has been signed by an intermediary and not directly by a root CA, it may be necessary to import both the root and the intermediate CA together in one entry, such as:
—–BEGIN CERTIFICATE—– [Subordinate/Intermediate CA certificate text] —–END CERTIFICATE—–
[Root CA certificate text] —–END CERTIFICATE—– |
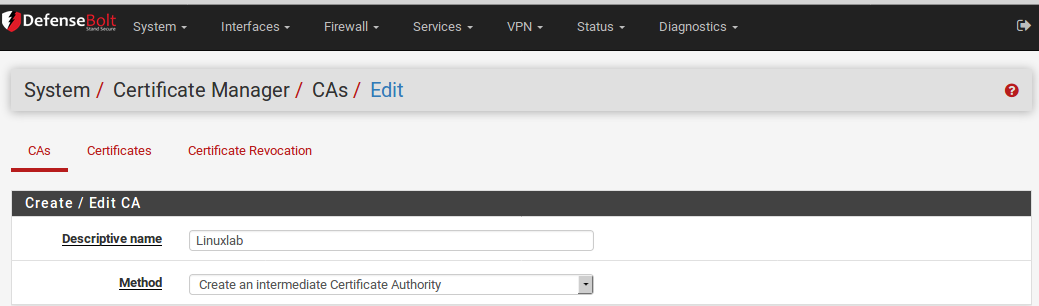
Create an Intermediate Certificate Authority
An Intermediate CA will create a new CA that is capable of generating certificates, yet depends on another CA higher above it. To create one, select Create an Intermediate Certificate Authority from the Method drop-down.
Note
The higher-level CA must already exist on DefenseBolt (Created or imported)
- Choose the higher-level CA to sign this CA using the Signing Certificate Authority drop-down. Only CAs with private keys present will be shown, as this is required to properly sign this new CA.
- Fill in the remaining parameters identical to those for Create an Internal Certificate Authority.
Edit a Certificate Authority
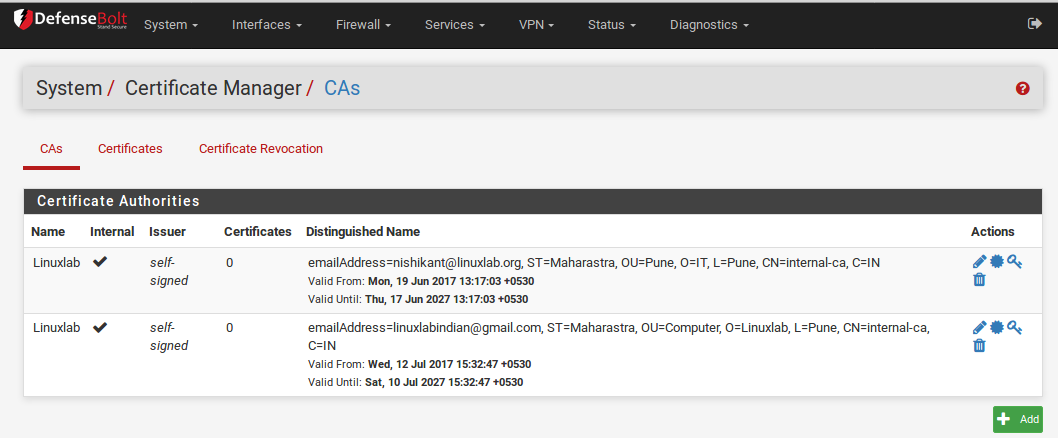
After a CA has been added, it can be edited from the list of CAs found at System > Cert Manager on the CAs tab. To edit a CA, click the edit icon at the end of its row. The screen presented allows editing the fields as if the CA were being imported.
For information on the fields on this screen, see Import an Existing Certificate Authority. In most cases the purpose of this screen would be to correct the Serial of the CA if needed, or to add a key to an imported CA so it can be used to create and signcertificates and CRLs.
Export a Certificate Authority
From the list of CAs at System > Cert Manager on the CAs tab, a the certificate and/or private key for a CA can be exported. In most cases the private key for a CA would not be exported, unless the CA is being moved to a new location or a backup is being made. When using the CA for a VPN or most other purposes, only export the certificate for the CA.
Warning
If the private key for a CA gets into the wrong hands, the other party could generate new certificates that would be considered valid against the CA.
To export the certificate for a CA, click the star icon on the left. To export the private key for the CA, click the key icon on the right. Hover the mouse pointer over the icon and a tooltip will display the action to be performed for easy confirmation. The files will download with the descriptive name of the CA as the file name, with the extension .crt for the certificate, and .key for the private key.
Remove a Certificate Authority
To remove a CA, first it must be removed from active use.
- Check areas that can use a CA, such as OpenVPN, IPsec, and packages.
- Remove entries utilizing the CA or select a different CA.
- Navigate to System > Cert Manager on the CAs tab.
- Find the CA to delete in the list.
- Click Delete at the end of the row for the CA.
- Click OK on the confirmation dialog.
If an error appears, follow the on-screen instructions to correct the problem and then try again.
3) Certificate
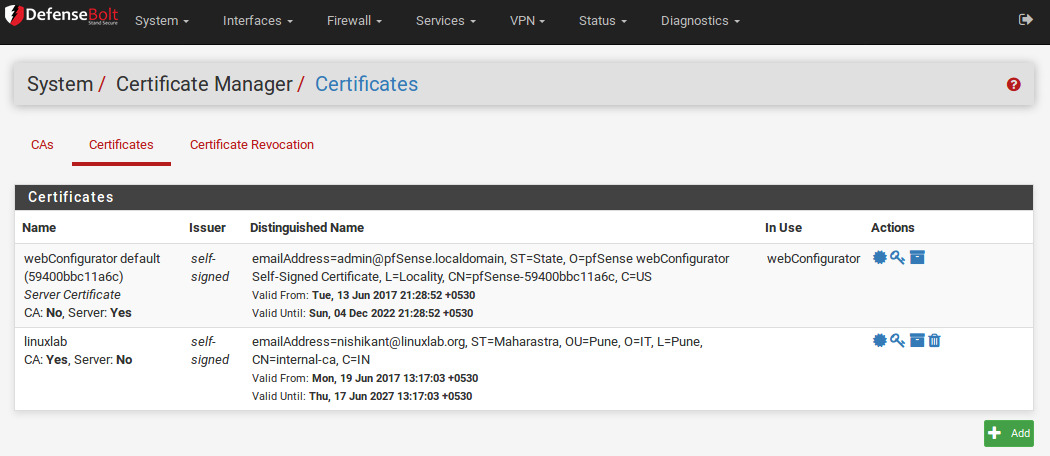
Certificates are managed from System > Cert Manager, on the Certificates tab. From this screen Certificates may be added, edited, exported, or deleted.
Create a new Certificate
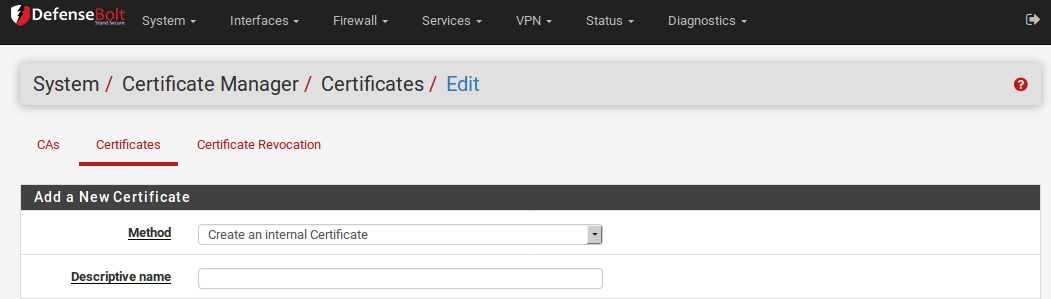
To create a new certificate, start the process as follows:
- Navigate to System > Cert Manager on the Certificates tab.
- Click Add to create a new certificate.
- Enter a Descriptive name for the certificate. This is used as a label for this certificate throughout the GUI.
- Select the Method that best suits how the certificate will be generated. These options and further instructions are in the corresponding sections below:
- Import an Existing Certificate
- Create an Internal Certificate
- Create a Certificate Signing Request
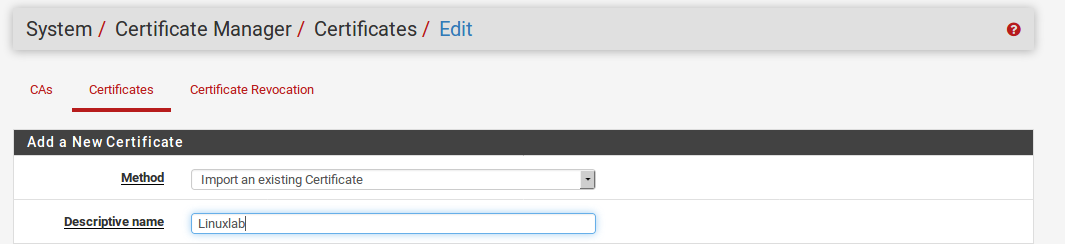
Import an Existing Certificate
If an existing certificate from an external source needs to be imported, it can be done by selecting the Method of Import an Existing Certificate. This can be useful for certificates that have been made using another system or for certificates that have been provided by a third party.
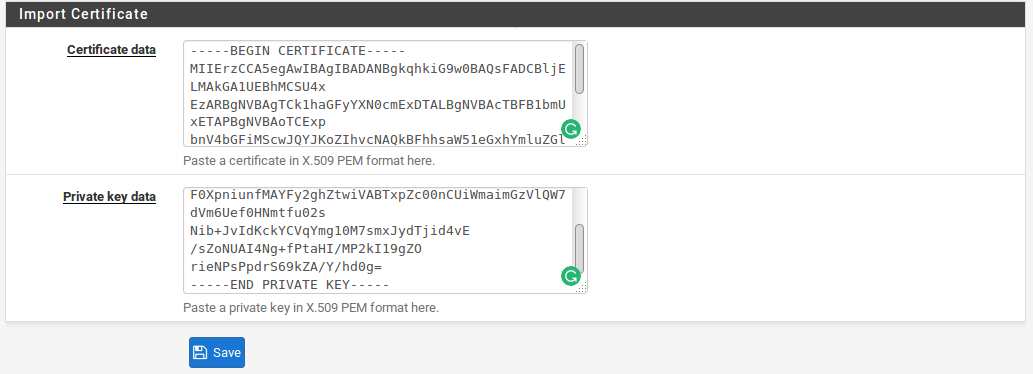
- Enter the Certificate data, this is required. It is typically contained in a file ending with .crt. It would be plain text, and enclosed in a block such as:
—–BEGIN CERTIFICATE—– [A bunch of random-looking base64-encoded data] —–END CERTIFICATE—– |
- Enter the Private key data which is also required. This is typically in a file ending in .key. It would be plain text data enclosed in a block such as:
—–BEGIN RSA PRIVATE KEY—– [A bunch of random-looking base64-encoded data] —–END RSA PRIVATE KEY—– |
- Click Save to finish the import process.
If any errors are encountered, follow the on-screen instructions to resolve them. The most common error is not pastingin the right portion of the certificate or private key. Make sure to include the entire block, including the beginning header and ending footer around the encoded data.
Create an Internal Certificate
The most common Method is Create an Internal Certificate. This will make a new certificate using one of the existing Certificate Authorities.
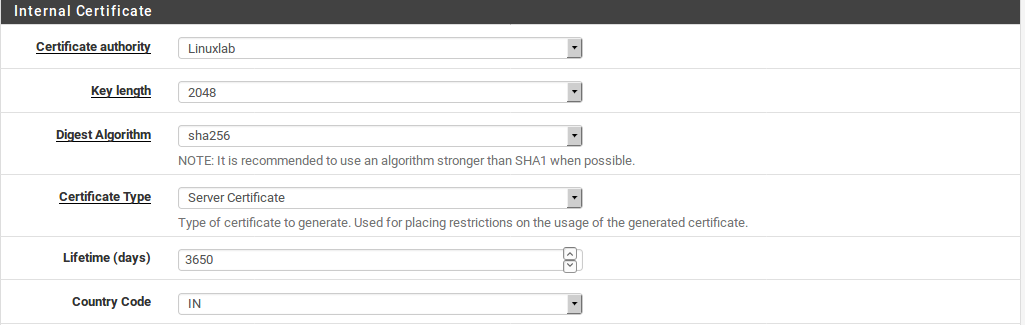
- Select the Certificate Authority by which this certificate will be signed. Only a CA that has a private key present can be in this list, as the private key is required in order for the CA to sign a certificate.
Select the Key length to choose how “strong” the certificate is in terms of encryption. The longerthe key, the more secure it is. However, longer keys can take more CPU time to process, so it isn’t always wise to use the maximum value. The default value of 2048 is a good balance.
- Select a Digest Algorithm from the supplied list. The current best practice is to use an algorithm stronger than SHA1 where possible. SHA256 is a good choice.
Note
Some older or less sophisticated equipment, such as VPN-enabled VoIP handsets may only support SHA1 for the Digest Algorithm. Consult device documentation for specifics.
- Select a Certificate Type which matches the purpose of this certificate.
- Choose Server Certificate if the certificate will be used in a VPN server or HTTPS server. This indicates inside the certificate that it may be used in a server role, and no other.
Note
Server type certificates include Extended Key Usage attributes indicating they may be used for Server Authentication as well as the OID 1.3.6.1.5.5.8.2.2 which is used by Microsoft to signifiy that a certificate may be used as an IKE intermediate. These are required for Windows 7 and later to trust the server certificate for use with certain types of VPNs. They also are marked with a constraint indicating that they are not a CA, and have nsCertType set to “server”.
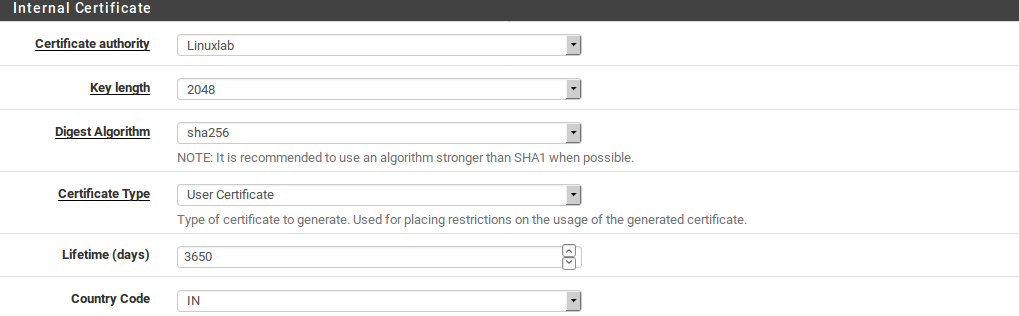
– Choose User Certificate if the certificate can be used in an end-user capacity, such as a VPN client, but it cannot be used as a server. This prevents a user from using their own certificate to impersonate a server.
Note
User type certificates include Extended Key Usage attributes indicating they may be used for client authentication. They also are marked with a constraint indicating that they are not a CA.
– Choose Certificate Authority to create an intermediate CA. A certificate generated in this way will be subordinate to the chosen CA. It can create its own certificates, but the root CA must also be included when it is used. This is also known as “chaining”.
- Enter a value for Lifetime to specify the number of days for which the certificate will be valid. The duration depends on personal preferences and site policies. Changing the certificate frequently is more secure, but it is also a management headache as it requires reissuing new certificates when they expire. By default the GUI suggests using 3650 days, which is approximately 10 years.
- Enter values for the Distinguished name section for personalized parameters in the certificate. Most of these fields will be pre-populated with data from the CA. These are typically filled in with an organization’s information, or in the case of an individual, personal information. This information is mostly cosmetic, and used to verify the accuracy of the certificate, and to distinguish one certificate from another. Punctuation and special characters must not be used.
- Select the Country Code from the list. This is the ISO-recognized country code, not a hostname top-level domain.
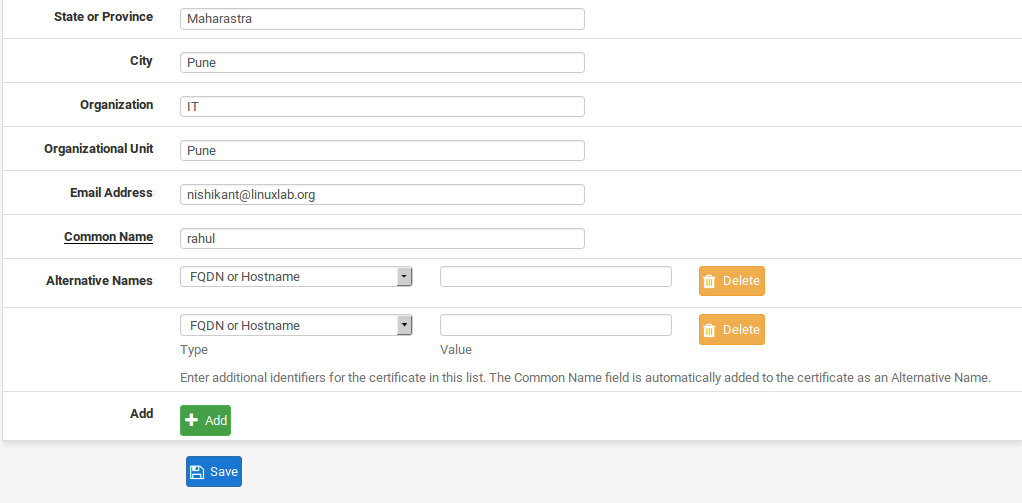
- Enter the State or Province fully spelled out, not abbreviated.
- Enter the City.
- Enter the Organization name, typically the company name.
- Enter a valid Email Address.
- Enter the Common Name (CN). This field is the internal name that identifies the certificate. Unlike a CA, the CN for a certificate should be be a username or hostname. For instance, it could be called VPNCert, user01, or vpnrouter.example.com.
Note
Although it is technically valid, avoid using spaces in the CN.
- Click pluse Add to add Alternative Names if they are required. Alternative Names allow the certificate to specify multiple names that are all valid for the CN, such as two different hostnames, an additional IP address, a URL, or an e-mail address. This field may be left blank if it is not required or its purpose is unclear.
- Enter a Type for the Alternative Name. This must contain one of DNS (FQDN or Hostname), IP (IP address), URI , or email .
- Enter a Value for the Alternative Name. This field must contain an appropriately formatted value based on the Type entered.
- Click Deleted Button Delete at the end of the row for an unneeded Alternative Name.
- Repeat this process for each additional Alternative Name.
- Click Save.
If errors are reported, such as invalid characters or other input problems, they will be described on the screen. Correct the errors, and attempt to Save again.
Create a Certificate Signing Request
Choosing a Method of Certificate Signing Request creates a new request file that can be sent into a third party CA to be signed. This would be used to obtain a certificate from a trusted root certificate authority. Once this Method has been chosen, the remaining parameters for creating this certificate are identical to thosefor Create an Internal Certificate.
Export a Certificate
From the list of certificates at System > Cert Manager on the Certificates tab, a certificate and/or its private key may be exported.
To export the certificate, click the star icon. To export the private key for the certificate, click the the key icon. To export the CA certificate, certificate and the private key for the certificate together in a PKCS#12 file, click the Box icon. To confirm the proper file is being exported, how over the mouse pointer over the icon and a tool tip will display the action to be performed.
The files will download with the descriptive name of the certificate as the file name, and the extension .crt for the certificate and .key for the private key, or .p12 for a PKCS#12 file.
Remove a Certificate
To remove a certificate, first it must be removed from active use. - Check areas that can use a certificate, such as the WebGUI options, OpenVPN, IPsec, and packages.
- Remove entries using the certificate, or choose another certificate.
- Navigate to System > Cert Manager on the Certificates tab.
- Locate the certificate to delete in the list
- Click Delete at the end of the row for the certificate.
- Click OK on the confirmation dialog.
If an error appears, follow the on-screen instructions to correct the problem and then try again.
User Certificates
If a VPN is being used that requires user certificates,they may be created in one of several ways. The exact method depends on where the authentication for the VPN is being performed and whether or not the certificate already exists.
No Authentication or External Authentication If there is no user authentication, or if the user authentication is being performed on an external server (RADIUS,LDAP, etc) then make a user certificate like any other certificate described earlier. Ensure that User Certificate is selected for the Certificate Type and set the Common Name to be the user’s username.
Local Authentication / Create Certificate When Creating a User
If user authentication is being performed on DefenseBolt, the user certificate can be made inside of the User Manager.
- Navigate to System > User Manager
- Create a user. See User Management and Authentication for details.
- Fill in the Username and Password

- Select Click to create a user certificate in the User Certificates section, which will display a simple form for creating a user certificate.
- Enter a short Descriptive Name, which can be the username or something such as Bob’s Remote Access VPN Cert.
- Choose the proper Certificate Authority for the VPN.
- Adjust the Key Length and Lifetime if desired.
- Finish any other required user details.
- Click Save
Local Authentication / Add a Certificate to an Existing User
To add a certificate to an existing user: - Navigate to System > User Manager
- Click to edit edit the user

- Click pluse Add under User Certificates.
- Choose options as needed available from the certificate creation process described in Create a new Certificate, or select Choose an existing certificate and then select from the Existing Certificates
For more information on adding and managing users, see User Management and Authentication.
3) Certificate Revocation
Certificate Revocation Lists (CRLs) are a part of the X.509 system that publish lists of certificates that should no longer be trusted. These certificates may have been compromised or otherwise need to be invalidated. An application using a CA, such as OpenVPN may optionally use a CRL so it can verify connecting client certificates. A CRL is generated and signed against a CA using its private key, so in order to create or add certificates to a CRL in the GUI, the private key of the CA must be present. If the CA is managed externally and the private key for the CA is not on the firewall, a CRL may still be generated outside of the firewall and imported.
The traditional way to use a CRL is to only have one CRL per CA and only add invalid certificates to that CRL. In DefenseBolt, however, multiple CRLs may be created for a single CA. In OpenVPN, different CRLs may be chosen for separate VPN instances. This could be used, for example, to prevent a specific certificate from connecting to one instance while allowing it to connect to another. For IPsec, all CRLs are consulted and there is no selection as currently exists with OpenVPN.
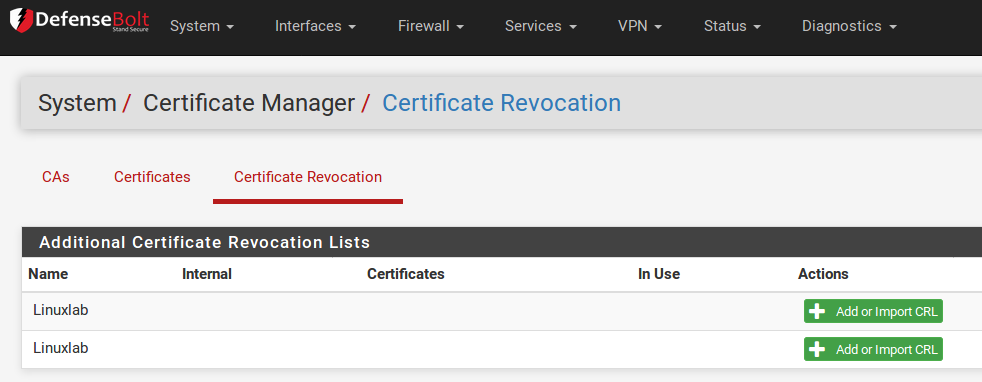
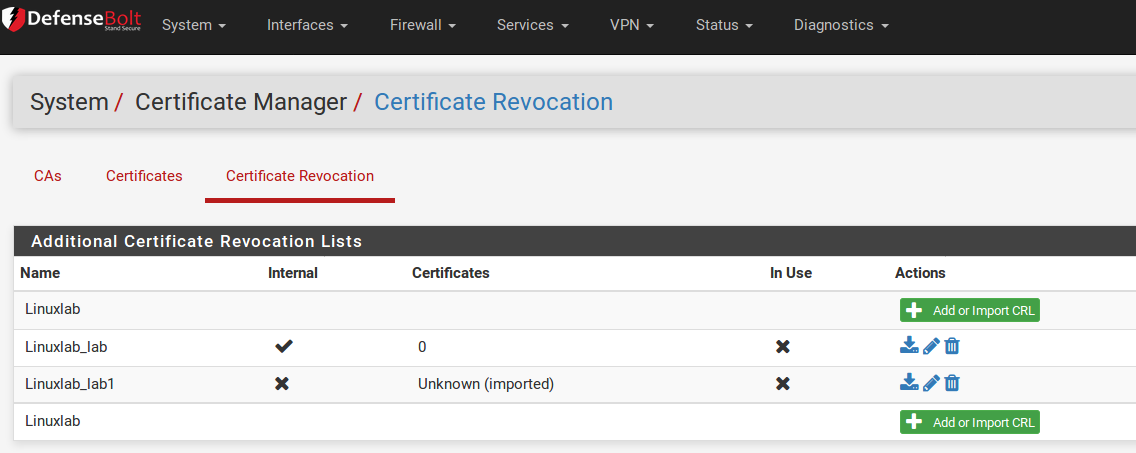
Certificate Revocation Lists are managed from System > Cert Manager, on the Certificate Revocation tab. From this screen CRL entries can be added, edited, exported, or deleted. The list will show all Certificate Authorities and an option to add a CRL. The screen also indicates whether the CRL is internal or external (imported), and it shows a count of how many certificates have been revoked on each CRL.
Note
CRLs generated using DefenseBolt later properly include the authorityKey Identifier attribute to allow proper functionality with strongSwan for use with IPsec.
Create a new Certificate Revocation List
To create a new CRL:
- Navigate to System > Cert Manager, on the Certificate Revocation tab.
- Find the row with the CA that the CRL will be created for.
- Click Pluse Butten and Add or Import CRL at the end of the row to create a new CRL.
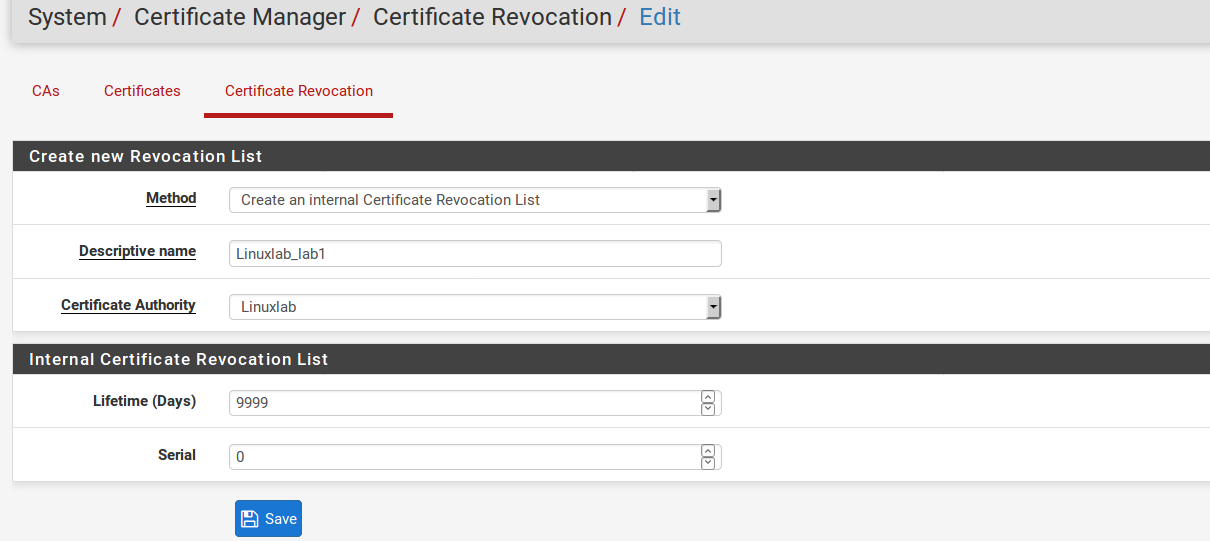
- Choose Create an Internal Certificate Revocation List for the Method.
- Enter a Descriptive Name for the CRL, which is used to identify this CRL in lists around the GUI. It’s usually best to include a reference to the name of the CA and/or the purpose of the CRL.
- Select the proper CA from the Certificate Authority drop-down menu
- Enter the number of days for which the CRL should be valid in the Lifetime box. The default value is 9999 days, or almost 27 and a half years.
- Click Save
The browser will be return to the CRL list, and the new entry will be shown there.

Import an Existing Certificate Revocation List
To import a CRL from an external source:
- Navigate to System > Cert Manager, on the Certificate Revocation tab
- Find the row with the CA that the CRL will be imported for.
- Click pluse and Add or Import CRL at the end of the row to create a new CRL.
- Choose Import an Existing Certificate Revocation List for the Method.
- Enter a Descriptive Name for the CRL, which is used to identify this CRL in lists around the GUI. It’s usually best to include a reference to the name of the CA and/or the purpose of the CRL.
- Select the proper CA from the Certificate Authority drop-down menu.
- Enter the CRL data. This is typically in a file ending in .crl. It would be plain text data enclosed in a block such as:
—–BEGIN X509 CRL—– [A bunch of random-looking base64-encoded data] —–END X509 CRL—– |
- Click Save to finish the import process.
If an error appears, follow the on-screen instructions to correct the problem and then try again. The most common error is not pasting in the right portion of the CRL data. Make sure to enter the entire block, including the beginning header and ending footer around the encoded data.
Export a Certificate Revocation List
From the list of CRLs at System > Cert Manager on the Certificate Revocation tab, a CRL may also be exported.
To export the CRL, click the download and the extension .crl. icon. The file will download with the descriptive name of the CRL as the file name,
Delete a Certificate Revocation List
- Check areas that can use a CRL, such as OpenVPN.
- Remove entries using the CRL, or choose another CRL instead.
- Navigate to System > Cert Manager on the Certificate Revocation tab.
- Locate the CRL to delete in the list
- Click the delete icon at the end of the row for the CRL.
- Click OK on the confirmation dialog.
If an error appears, follow the on-screen instructions to correct the problem and then try again.
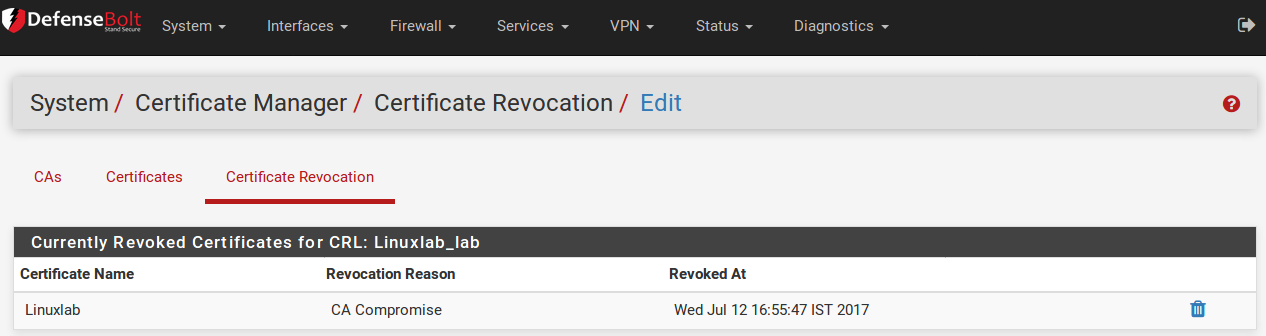
Revoke a Certificate
A CRL isn’t very useful unless it contains revoked certificates. A certificate is revoked by adding the certificate to a CRL:
- Navigate to System > Cert Manager on the Certificate Revocation tab.
- Locate the CRL to edit in the list
- Click the Delete icon at the end of the row for the CRL. A screen will be presented that lists any currently revoked certificates, and a control to add new ones.
- Select the certificate from the Choose a Certificate to Revoke list.
- Select a Reason from the drop-down list to indicate why the certificate is being revoked. This information doesn’t affect the validity of the certificate it is merely informational in nature. This option may be left at the default value.
- Click Add and the certificate will be added to the CRL.
Certificates can be removed from the CRL using this screen as well:
- Navigate to System > Cert Manager on the Certificate Revocation tab.
- Locate the CRL to edit in the list
- Click the edit icon at the end of the row for the CRL.
- Find the certificate in the list and click the Delete icon to remove it from the CRL.
- Click OK on the confirmation dialog.
After adding or removing a certificate, the CRL will be re-written if it is currently in use by any VPN instances so that the CRL changes will be immediately active.
Updating an Imported Certificate Revocation List
To update an imported CRL:
- Navigate to System > Cert Manager on the Certificate Revocation tab.
- Locate the CRL to edit in the list
- Click the edit icon at the end of the row for the CRL.
- Erase the pasted content in the CRL Data box and replace it with the contents of the new CRL
- Click Save.
After updating the imported CRL, it will be re-written if it is currently in use by any VPN instances so that the CRL changes will be immediately active.