Advanced
Under System Advanced you will find a lot of options that are of a more advanced nature. None of theseoptions should need adjustment for a basic routing/NAT setup, but you may find that some of the changes governed by these options will help in customizing your configuration in beneficial ways.
Some of these options may be covered in more detailin other sections of the book where their discussion would be more topical or relevant, but they are all mentioned here with a brief description.

Admin Access Tab
The options found on the Admin Access tab govern the various methods for administering the firewall, including via the web interface, SSH, serial, and physical console.
1.1) WebConfigurator
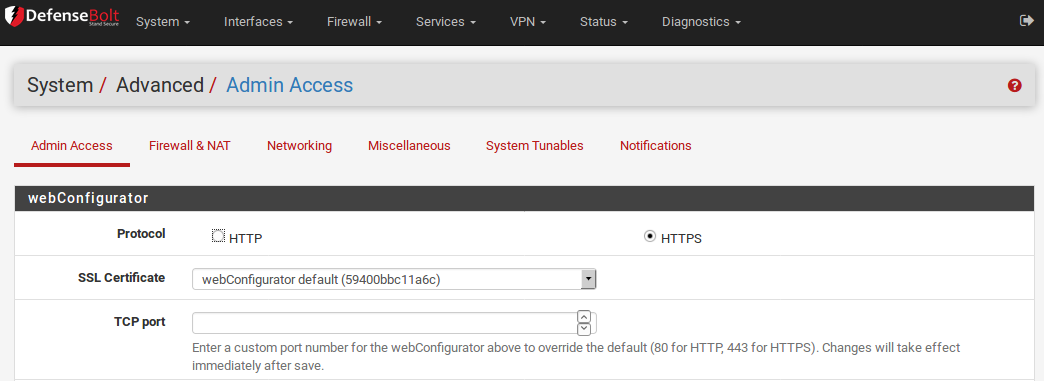
Protocol
The WebGUI Protocol may be set to either HTTP or HTTPS. The best practice would be to use HTTPS so that the WebGUI traffic is encrypted, especially if the firewall will be managed remotely.
SSL Certificate
If HTTPS is chosen, you must also select a certificate from the SSL Certificate drop-down list. Out ofthe box, you should have at least one choice here,webConfigurator default. The default certificate is self-signed. That is not an ideal situation, but is better than no encryption at all. This option allows you to use an existing certificate to further enhance security and protect against man-in- the-middle attacks. If you have an existing SSL certificateand key, you may import them using the Certificate Manager, and then select the certificate here. You may also make additional certificates by using the Certificate Manager if needed.
The main downside to using a custom self-generated certificate is the lack of assurance of the identity of the host,since the certificate is not signed by a Certificate Authority trusted by your browser. Additionally, because for the bulk of Internet users such an invalid certificate should be considered a risk, modern browsers have been cracking down on how they are handled. Firefox, for example, gives a warning screen and forces the user to import the certificate and allow a permanent exception. Internet Explorer will show a warning screen with a link to continue, as does Chrome. Opera will show a warning dialog that also allows a permanent bypass.
TCP Port
Moving the WebGUI to an alternate port is preferredby some for security by obscurity reasons, though such practices should not be considered any securitybenefit. It can free up the standard web ports foruse with port forwards or other services such as a Squid proxy. By default the WebGUI uses HTTPS on port 443 with a redirect from port 80 for the best compatibility and ease of initial configuration. If you would like to change the port, enter a new port number into the TCP Port field.
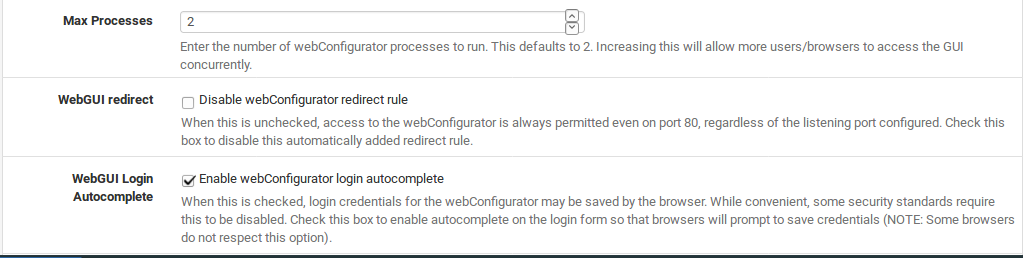
Max Processes
If you find that you have multiple people viewing the GUI at the same time and some pages are taking too long to load, or failing to load, then you may need to increase the Max Processes value. By defaultit is set to 2, so it runs two web server processes.
WebGUI Redirect
By default, for ease of access and compatibility, the firewall runs a redirect on port 80 so that if you attempt to access the router with HTTP, it will accept the request and then redirect the session to HTTPS on port 443. This redirect can be disabled by checking Disable webConfigurator redirect rule issomething else needs to bind to port 80 or there isanother reason it would be unwanted.
WebGUI Login Autocomplete
For convenience, the login form allows autocompleteso your browser can save the login credentials. In some environments, such as those needing to comply with specific security guidelines, this behavior isnot acceptable. As such,it can be disabled by checking Disable webConfigurator login autocomplete. Be aware, however, that not all browsers respect this option. Specifically, Opera will still offer to save passwords even when the form specifies that it should not be allowed. This only controls autocomplete on the login form. Even if autocomplete is enabled for login, the completion of forms else where in the GUI remains disabled to prevent the browser from automatically filling your credentials into unrelated fields.
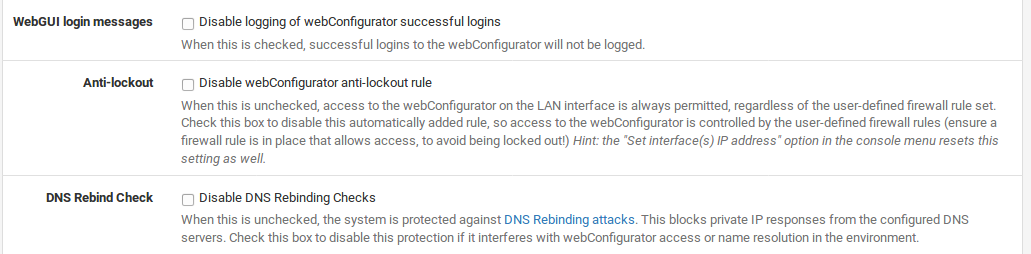
WebGUI login messages
Successful logins will result in a message being printed to the console, and on some hardware this will also cause a beep to be heard from the devicewhen such a console message occurs. If you do not wish to see this message (or hear the resulting beep), check the Disable logging of webConfigurator successful logins box.
Anti-lockout
By default, access to the WebGUI and SSH on the LANinterface is always permitted, regardless of the user-defined filter rules. Enabling this feature willallow more fine-grained control over which LAN IP addresses may access the WebGUI, but be sure you have a filter rule in place to allow access before enabling this option!
Note: Resetting the LAN IP from the system console will also reset this option. If you find yourself locked out after enabling this, choose the console menu option to set the LAN IP, and enter in theexact same IP address and accompanying information. In DefenseBolt rule allowed all traffic to reach the firewall’s LAN IP address. interface enabled, the anti-lockout rule will become active on that interface.
DNS Rebind Check
The remaining options in this section control some of the new security measures put in place to protect the GUI against various means of browser-based attacks. The first of these is DNS Rebinding Checks. When set, this blocks private IP responses from your configured DNS servers. Check this box to disable this protection if it interferes with webConfigurator access or name resolution in your environment. More detail on DNS rebinding attacks may be found on Wikipedia. To disable this behavior, check Disable DNS Rebinding Checks. The most common cause for disabling this would be when your firewall is set to use an internal DNS server which will return private (RFC1918) answers for hostnames. If you access the firewall by IP address, these checks are not enforced because the attack is only relevant when using a hostname.
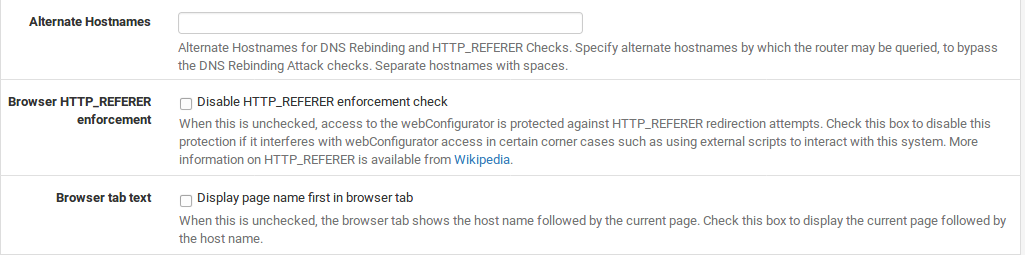
Browser HTTP_REFERER enforcement
The GUI also checks the referring URL when it is accessed, to prevent a form on another site from submitting a request to the firewall, changing an option when you did not intend for that to happen. This also breaks some desirable behavior, such as having a page that links to your various firewall devices. If you wish to disable this behavior, you may check Disable HTTP_REFERER enforcement check.
Alternate Hostnames
If you wish to keep the above options enabled, but control the behavior slightly, you may fill in alternate hostnames in the Alternate Hostnames for DNS Rebinding and HTTP_REFERER Checks box. By default the system will allow access to the hostname configured on the firewall and all IPs configured on the system.
Man-In-The-Middle Attack/Warning
If you attempt to access the firewall by an IP address that is not configured on the system, such as aport forward from another firewall, a message will be printed that you may be the result of a Man-In-The-Middle (MITM) attack. If you configured such a forwarding yourself, the message may be safely ignored. If you did not configure the forward, then you should take great care before logging in to ensure your login credentials are not being routed through a system you do not control or trust. Access is not disabledin this case, only a warning, so there isno option to disable this behavior.
1.2) Secure Shell (SSH)

The Secure Shell (SSH) server may be enabled which will allow remote console and file management. You may connect with any standard SSH client, such as the OpenSSH command line ssh client, PuTTY, SecureCRT, or iTerm. Either the WebGUI username (such as admin) or the root account may be used, and both accept the WebGUIpassword for login. If you have created other users in the User Manager and they also have the User - System - Shell account access permission, then they are allowed to login over ssh as well. File transfers to and from the pfSense system arealso possible by using a Secure Copy (SCP) client such as OpenSSH’s command line scp , FileZilla, WinSCP or Fugu. To use SCP, you must connect as the root user, not admin. If you have created a user that has the User - System - Copy files permission, or allaccess, then they may also utilize SCP.
Enable Secure Shell To enable SSH, check the box next to Enable Secure Shell. After you save with this setting checked, the system will generate SSH keys (if they are not already present) and start the SSH daemon.
Authentication Method
You can also set SSH to only allow key-based logins and not a password. Switching to only key-based login is a much more secure practice, though it does take a little more preparation to configure. To do this, check Disable Password login for Secure Shell (RSA KEY only). You add keys for key-based login by editing your users in the User Manager (User Management and Authentication) and pasting the allowed public keys into the Authorized Keys text field for their account. In DefenseBolt and earlier, there was a box here to paste the key since there was onlyone account (admin).
SSH Port
It is also more secure to move the SSH server to analternate port. As with moving the WebGUI to an alternate port, it provides a small security improvement, and frees upthe port if you want to forward it to an internal system. To change the port, type thenew port into the SSH Port box.
1.3) Serial Communication
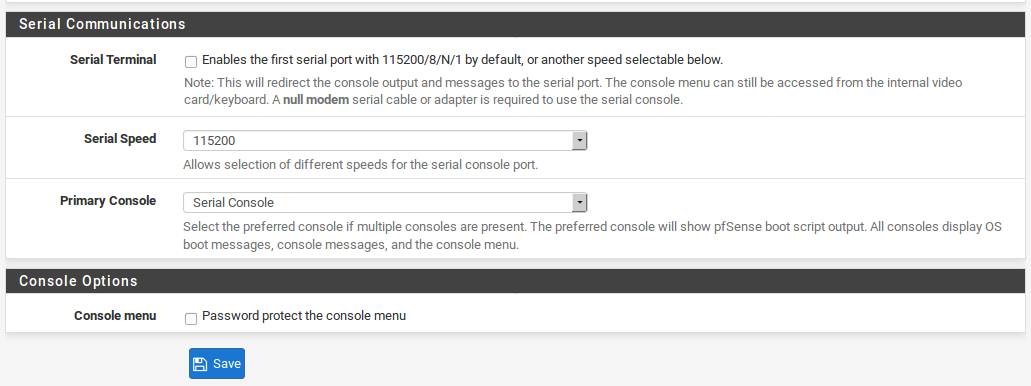
Serial Console
If this DefenseBolt system will be running “headless” (without keyboard, video, mouse attached) it may be desirable to enable this option, which will redirect the consoleinput/output to the serial port. This will not disable the onboard keyboard, video, and mouse but will allow you to attach a null modem cable to the serial port and manage it directly from another PC or serial device. After making any changes, be sure to click Save when finished.
With both the serial console enabled and a monitor attached, the serial console is preferred, so it will receive the boot log messages from pfSense. Some other OS kernel messages will show up on all console connections, and both consoles will have a usable menu.
For more information on connecting to a serial console, see Connect a Serial Cable and Start a Serial Client.
Serial Console Speed
New in DefenseBolt is the ability to change the serial console speed. Previously, this was always locked to 9600bps. Now it can be set higher by selecting a faster speed from the drop-down menu. The fastest possible speed is 115200bps.
1.4) Console Options
Console Menu
Normally, the console menu is always showing on thesystem console, and will be available as long as you have physical access to the serial or video console. In some situations this is not desirable, so this option will allow the console to be password protected. You may login with the same username and password used for the WebGUI. After setting this option, you must reboot the defenseBolt system before it will take effect.
Note: While this will stop accidental keypresses, and keep out casual users, this is by no means a perfect security method. A knowledgeable person with physical access could still reset the passwords (see Forgotten Password with a Locked Console). You should consider other physical security methods if that is a requirement of your installation.
Firewall/NAT Tab
Firewall Advanced
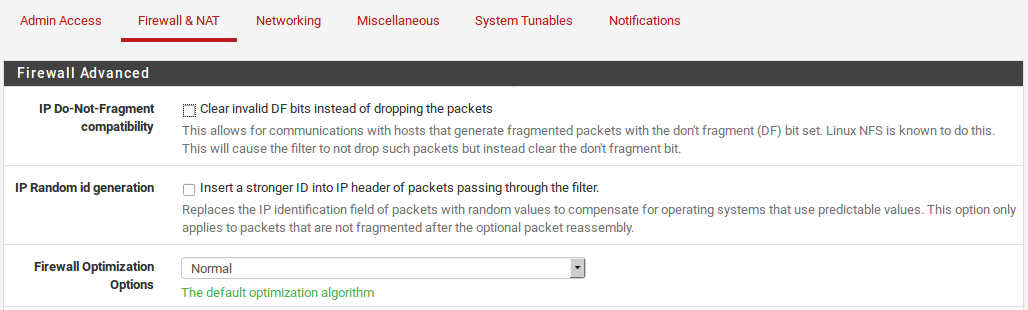
IP Do-Not-Fragment compatibility
This is a workaround for operating systems that generate fragmented packets with the don’t fragment (DF) bit set. Linux NFS (Network File System) is known to do this. This will cause the filter to not drop such packets but instead clear the don’t fragment bit. The filter will also randomize the IP identification field of outgoing packets with this option on, to compensate for operating systems that set the DF bit but set a zero IP identification header field.
IP Random ID generation
If Insert a stronger id into IP header of packets passing through the filter is checked, the firewall replaces the IP identification field of packets with random values to compen sate for operating systemsthat use predictable values. This option only applies to packets that are not fragmented after the optional packet reassembly.
Firewall Optimization Options
There are a few choices here that control how the firewall expires states:
Normal: The standard optimization algorithm.
High Latency: Used for high latency links, such as satellite links. Expires idle connections later than default.
Aggressive: Expires idle connections quicker. More efficient use of CPU and memory but can drop legitimate connections earlier than expected. This option can also improve performance in high traffic deployments with lots of connections, such as web services.
Conservative: Tries to avoid dropping any legitimate connections at the expense of increased memory usage and CPU utilization.
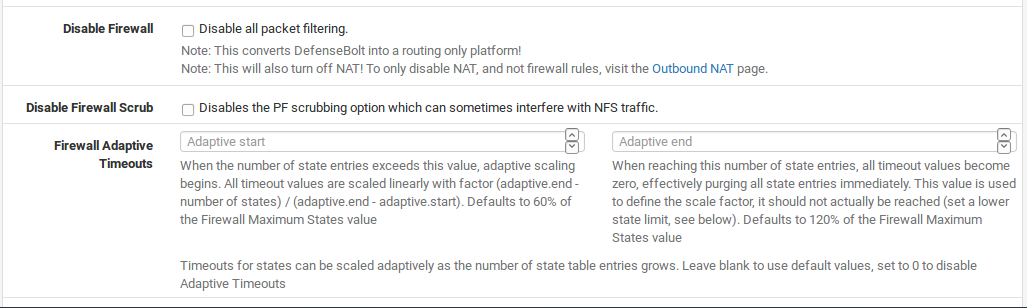
Disable Firewall
If you choose to Disable all packet filtering, it will turn your DefenesBolt system into a routing-only platform. As a consequence, NAT will also be disabled. If you only wish to disable NAT, do not use this option, rather see Disabling Outbound NAT for more information on controlling outbound NAT behavior.
Disable Firewall Scrub
Disables the PF scrubbing option which can sometimes interfere with NFS and PPTP traffic. By default, Defensebolt. uses the random-id scrub option which randomizes the IP identification field of a packet for added security, and the fragment reassemble option which will reassemble fragmented packets before sending them on to their destination. More information on the Scrub feature can be found on the OpenBSD PF Scrub Documentation.
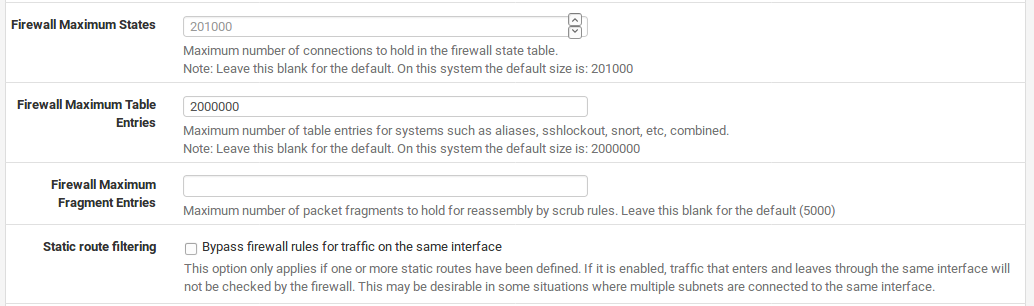
Firewall Maximum States
Sets the maximum number of connections to hold in the firewall state table. The default is dynamic, and sized at 10% of the amount of RAM in the system. This default value should be sufficient for most installations, but can be adjusted higher or lower depending on the load and memory available. Each state consumes about 1 KB of RAM, or roughly 1 MB of RAM for every 1000 states, so ensure you have adequate free RAM before increasing this. Firewall states are discussed further in Stateful Filtering.
i Firewall Maximum Tables
Maximum number of tables that can exist on the system for items such as aliases. Note that this is the number of tables/aliases themselves, not the countof items inside aliases (that’s the next option). By default this is 3,000 entries, which due to various ways the system operates effectively limits you to around 1500 aliases. This can be increased as needed with little to no impact on other resources, but having that many aliases would also be difficult to manage in the GUI.
Firewall Maximum Table Entries
Maximum number of entries that can exist inside of tables for systems such as aliases, sshlockout, snort, etc. By default this is 200,000 entries. If you use features such as URL Table aliases to load large blocks of address space into aliases, then you may need to increase this value. Each table entry will consume some amount of RAM, so be careful not to set it arbitrarily high.
Static Route Filtering
The Bypass firewall rules for traffic on the same interface option only applies if you have defined one or more static routes. If it is enabled, traffic that enters and leaves through the same interface will not be checked by the firewall. This may be required in some situations where multiple subnets are connected to the same interface, to avoid blocking traffic that is passed through the firewall in one direction only due to asymmetric routing. See Bypass Firewall Rules for Traffic on Same Interface for a more in- depth discussion on that topic.
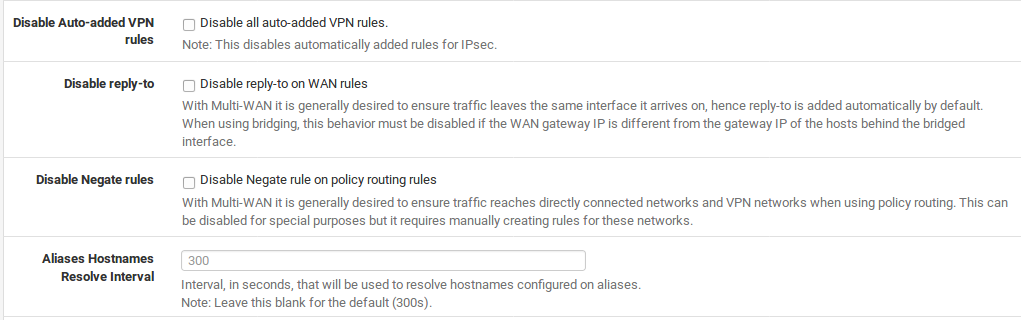
Disable Auto-added VPN rules
This disables automatically added rules for IPsec. Normally, when you enable one of these VPNs, rules are automatically added to the appropriate interface which will allow traffic in to those ports. By disabling these automatic rules, you can have more control over which addresses are allowed to connect to the VPN. Further information on these rules can be found at VPNs and Firewall Rules.
Disable Reply-To
With Multi-WAN you generally want to ensure traffic leaves the same interface it arrives on, hence reply-to is added automatically by default to ensure this association for return traffic. When using bridging, you must disable this behavior if the WAN gateway IP is different from the gateway IP of the hosts behind the bridged interface. Another use case involves static routing to other systems in a larger WAN subnet where this option would help ensure that replies went back to the proper system instead ofbeing routed back to the gateway.
Disable Negate rules
With Multi-WAN you generally want to ensure trafficreaches directly connected networks and VPN networks when using policy routing. pfSense will insert some rules to pass this local and VPN traffic withouta gateway specified, to maintain connectivity. You can disable this for special purposes but if you do so, you must manually create rules for these networks without a gateway set so they may be reached without policy routing.
Aliases Hostnames Resolve Interval
This option controls how often hostnames in aliases are resolved and updated. By default this is 300 seconds (5 minutes). If you do not have very many hostnames, and you need more frequent updates, this can be reduced.

Bogon Networks
The Update Frequency drop-down for Bogon Networks controls how often these lists are updated. Further information on bogon networks may be found in Block bogon networks
Network Address Translation
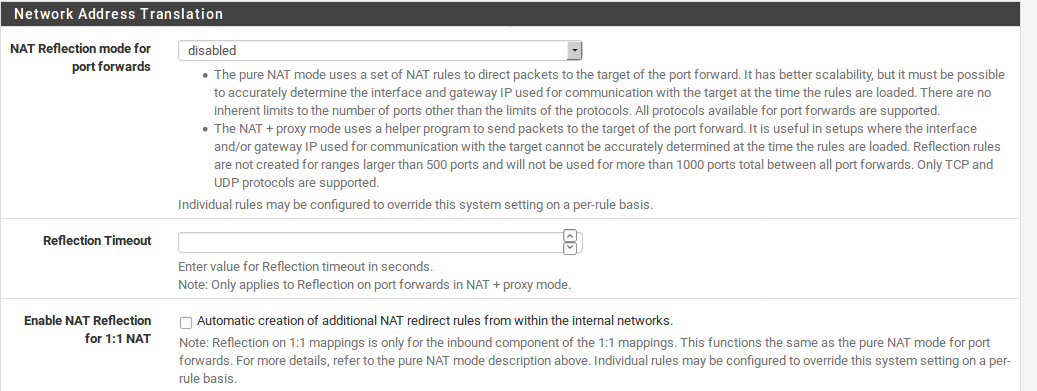
NAT Reflection for Port Forwards
The NAT Reflection mode for port forwards option controls how NAT reflection rules are made. These NAT redirect rules allow you to access port forwards on your public IP addresses from within your internal networks. These rules are disabled by default, so NAT Reflection rules are not created unless you change this setting. Refer to NAT Reflection for a discussion on the merits of NAT Reflection when compared to other techniques such as Split DNS.
The NAT + proxy mode uses a helper program to send packets to the target of the port forward. It is useful in setups where the interface and/or gateway IP used for communication with the target cannot be accurately determined at the time the rules are loaded. Reflection rules are not created for ranges larger than 500 ports and will not be used for more than 1000 ports total between all port forwards. Only TCP and UDP protocols are supported.
The pure NAT mode uses a set of NAT rules to direct packets to the target of the port forward. It has better scalability, but it must be possible to accurately determine the interface and gateway IP used for communication with the target at the time the rules are loaded. There are no inherent limits to the number of ports other than the limits of the protocols. All protocols available for port forwards are supported.
Individual NAT rules also contain an option to override the behavior determined by this selection, so they may have NAT reflection forced on or off on a case-by-case basis.
Reflection Timeout
The Reflection Timeout setting allows you to force a timeout for connections made when performing NAT reflection for port forwards in NAT + Proxy mode. If some connections are staying open longer than desired and causing issues, this option would help mitigate that issue.
NAT Reflection for 1:1 NAT
When checked, this option adds additional NAT 1:1 mappings for access to 1:1 mappings of your external IP addresses from within your internal networks. This gives the same functionality that already exists for port forwards, but for 1:1 NAT. There are some complex routing scenarios that may render this option ineffective. Additionally, this only affects the inbound path for 1:1 NAT, not outbound. The underlying rule style is similar to the Pure NAT mode for port forwards. As with port forwards, there are per-entry options to override this behavior.

Outbound NAT for 1:1 NAT Reflection
When the box is checked for Automatically create outbound NAT rules which assist inbound NAT rules that direct traffic back out to the same subnet it originated from, it does what the option says. It addssome additional rules which allow 1:1 NAT Reflection to function fully. In most cases, you will want to check this box if you want 1:1 NAT Reflection to work. This only works for assigned interfaces. Other interfaces require manually creating the outbound NAT rules that direct the reply packets back through the router.
TFTP Proxy
The built-in TFTP proxy will proxy connections to TFTP servers that are outside the firewall, so that client connections may be made to remote TFTP servers. You may ctrl-click or shift-click to select multiple entries from the list. If no interfaces are chosen, the TFTP proxy service is deactivated
Networking Tab
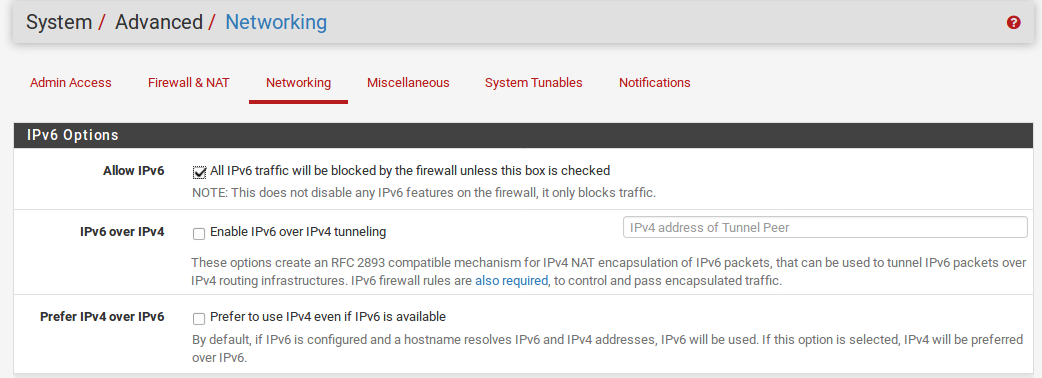
IPv6 Options
Allow IPv6
Starting with IPv6 filtering is supported so the Allow IPv6 Traffic option is enabled by default for configurations that started on version 2.1. If you do not want to allow IPv6 traffic through your firewall, you may uncheck this box and all IPv6 trafficwill then be blocked and logged if you are loggingpackets dropped by the default deny rule. Systems upgraded from earlier versions retain the value of this setting from prior to the upgrade, which defaulted to not allowing IPv6.
IPv6 over IPv4 Tunneling
You may also check Enable IPv4 NAT encapsulation ofIPv6 packets by checking that box, which enables IP protocol 41/RFC 2893 forwarding to the IPv4 address specified in the IP address field. That would allow you to forward all IPv6 traffic to a host behindthis firewall instead of handling it locally.
Network Interfaces
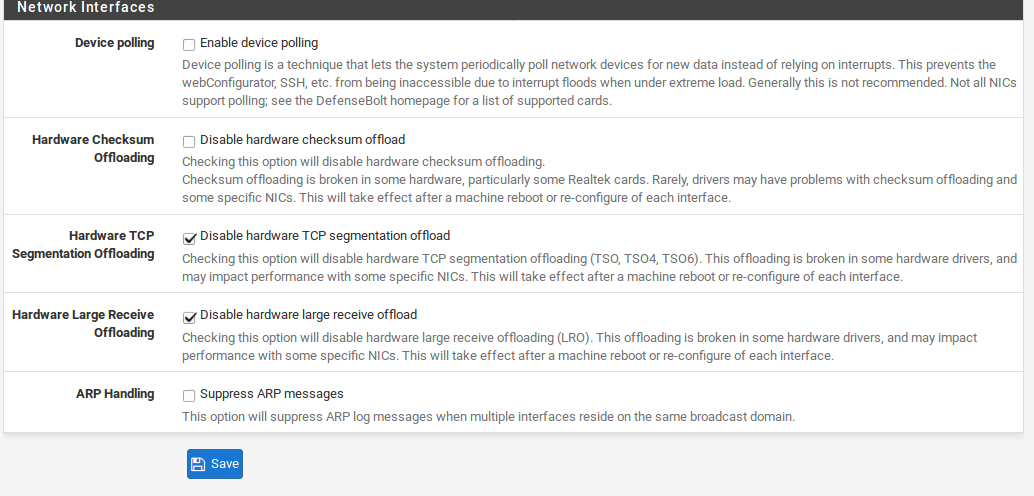
Device Polling
Device polling is a technique that lets the system periodically poll network devices for new data instead of relying on interrupts. This prevents your WebGUI, SSH, etc. from being inaccessible due to interrupt floods when under extreme load, at the cost of slightly higher latency (up to 1 ms). This is usually unnecessary, unless your hardware is undersized. Polling also requires hardware support in your system’s network cards. According to the polling(4) man page for FreeBSD 8.3. the bge(4), dc(4), em(4), fwe(4), fwip(4), fxp(4), ixgb(4), nfe(4), nge(4), re(4), rl(4), sf(4), sis(4), ste(4), stge(4), vge(4), vr(4), and xl(4) devices are supported, with support for others pending in future FreeBSD releases.
Note: With polling enabled, the system will appear to use 100% CPU. This is normal, as the polling thread is using CPU to look for packets. The polling thread is run at a lower priority so that if other programs need CPU time, it will give it up as needed. The downside is that this option makes the CPU graph less useful.
Hardware Checksum Offloading
Checking this option will disable hardware checksum offloading. Checksum offloading is broken in some hardware, particularly some Realtek cards. Rarely, drivers may have problems with checksum offloading and some specific NICs. Typical symptoms of broken checksum offloading include corrupted packets and poor throughput performance.
Hardware TCP Segmentation Offloading
Checking this option will disable hardware TCP segmentation offloading (TSO, TSO4, TSO6). This offloading is broken in some hardware drivers, and may impact performance with some specific NICs. This option is more desirable for workstations/appliances than for routers and firewalls, so it is left as an option in case it does increase performance for certain deployments.
Hardware Large Receive Offloading Checking this option will disable hardware large receive offloading (LRO). This offloading is broken in some hardware drivers, and may impact performance with some specific NICs. As with the TSO option above, this option is more desirable for workstations/appliances than for routers and firewalls, so it is left as an option in case it does increase performance for certain deployments.
Suppress ARP messages
If you have two or more interfaces which share the same physical network, such as in a scenario where multiple interfaces are plugged into the same broadcast domain, this option will hide the spurious ARPmessages that would otherwise overload the logs with useless entries.
Miscellaneous Tab
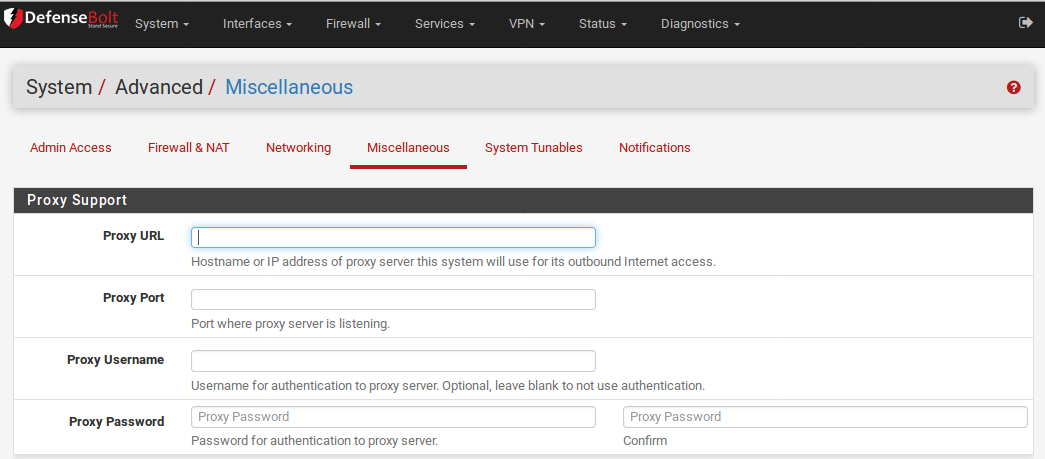
Proxy Support
If this firewall resides in a network behind a proxy, you may enter the proxy options below so that requests from the firewall for things such as packages and updates will be sent through the proxy.
Proxy URL
This option specifies the location of the proxy for making outside connections.
Proxy Port
The port to use when connecting to the proxy URL. By default the port is 8080 for http proxy URLs, and 443 for SSL proxy URLs.
Proxy Username
If required, this is the username that should be sent when the firewall must use the proxy.
Proxy Password
If required, this is the password associated with the username set in the previous option.
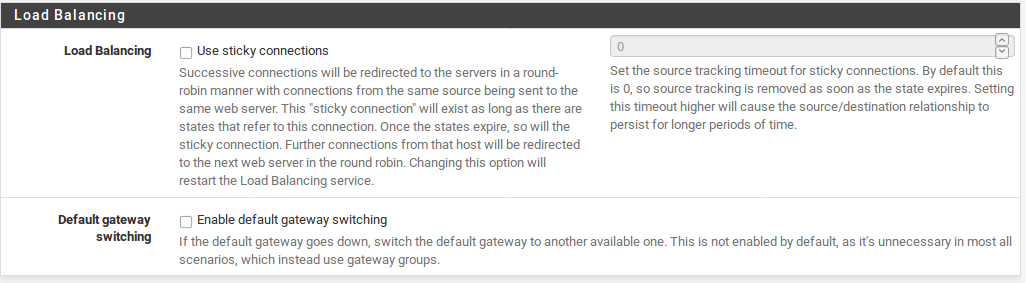
Load Balancing
Sticky Connections
The text in the WebGUI best explains Sticky Connections option in this section: Successive connections will be redirected to the servers in a round-robin manner with connections from the same source being sent to the same web server. This sticky connection will exist as long as there are states that refer to this connection. Once the states expire, so will the sticky connection. Further connections from that host will be redirected to the next web server in the round robin.
“Sticky” connections are desirable for some applications that rely on the same IPs being maintained throughout a given session. This is used in combination with the server load balancing functionality, described further in Server Load Balancing.
This option applies to outbound load balancing (Multi-WAN) as well as server load balancing.
You may also enter a value for the source tracking timeout of sticky connections. This will retain the sticky association from a host after the all of the states from that host expire for however many seconds are entered in the box. By default, this value is not set, which assumes 0 for the value, deleting the association as soon as the states expire. If you find that sticky is working for you, but seems to stop working partway through sessions, you can increase this value to hold an association longer.
Default Gateway Switching
The Allow default gateway switching option, disabled by default, will allow other gateways to take over should the default gateway become unreachable. With multiple WANs, this would ensure that the firewall always has a default gateway so that traffic from the firewall itself can always get out to the Internet. There are many cases where this is not desirable, however, such as when you have an additional “WAN” that is not connected to the Internet. In thefuture this option will be expanded so it can be controlled on a per-gateway basis.
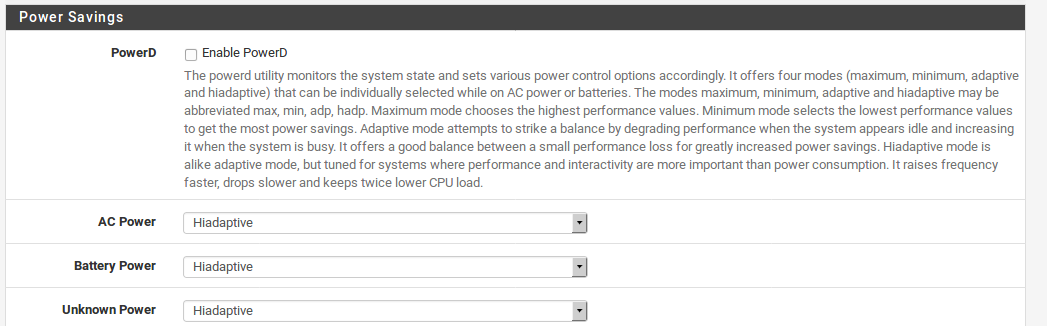
Power Savings
If the Use PowerD option is checked, then the powerd daemon is enabled. This daemon monitors the system and can lower the CPU frequency during periods oflow activity. If processes need the power, the CPUspeed will be increased as needed. This option will lower the amount of heat a CPU generates, and may also lower power consumption. The behavior of this option depends greatly on the hardware in use. In some cases, the CPU frequency may lower but have no measurable effect on power consumption and/or heat, where others will cool down and use less power considerably. It is considered safe to run, but is left off by default.
The mode for powerd may also be selected. Four modes exist, maximum, minimum, adaptive, and hiadaptive. Maximum keeps the performance as high as possible. Minimum keeps performance at its lowest, to reduce power consumption. Adaptive tries to balance savings by decreasing performance when the system is idle and increasing when busy. Hiadaptive is similar to adaptive but tuned to keep performance high at the cost of increased power consumption. It raises the CPU frequency faster and drops it slower. You may select one mode for normal operation and another for when the system is on battery power. Support for battery power detection varies by hardware.
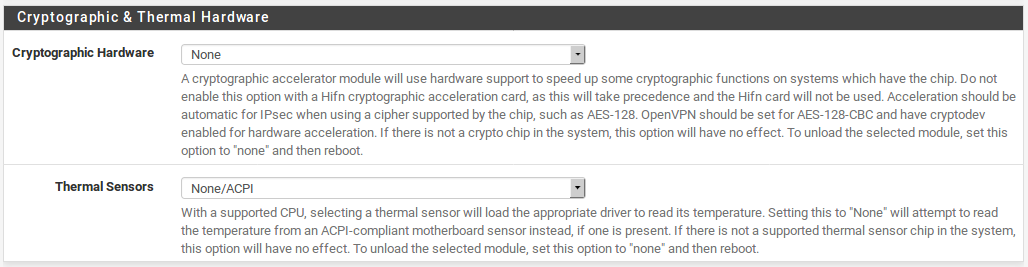
Cryptographic Hardware Acceleration
There are a few options available for accelerating cryptographic operations via hardware. Some are built into the kernel, and others are loadable modules. Two of the optional modules are selectable here: The AMD Geode LX Security Block ( glxsb) and AES-NI (Advanced Encryption Standard, New Instructions).
The glxsb driver is used mainly in ALIX and Soekris embedded systems. It is a cryptographic accelerator which can improve performance for certain ciphers, such as AES-128. This can improve VPN performance and other subsystems which may use AES-128, such as SSH. If you select AMD Geode LX Security Block (glxsb), the driver will be loaded at startup so that the accelerator chip may be used. This driver can conflict with other cryptographic accelerator cards,such as those from Hifn, and take precedence over them when both are found. If you have a Hifn card, you should uncheck this option so that the glxsb device is never loaded. If the driver is already in use, you must reboot after setting this option so it can be unloaded.
If AES-NI CPU-based Acceleration (aesni) is chosen,then its kernel module will be loaded when saved, and at bootup. As with glxsb, aesni will accelerate certain AES-based ciphers. Support for AES-NI is found in many recent Intel CPUs and some AMD CPUs. Intel CPU support can be found in Westmere (except i3), Sandy Bridge (except i3, Celeron, Pentium), and Ivy Bridge (all variants have it) CPUs. AMD support is limited to their Bulldozer line as of this writing. Speeds with AES-NI vary by support of the underlying software as well. Some OpenSSL-based software like OpenVPN can perform differently with AES- NI unloaded since OpenSSL has built-in support for AES-NI.
These drivers hook into FreeBSD’s crypto(9) framework, so many aspects of the system will automatically use the feature for supported ciphers. For OpenVPN to use these accelerators, on the VPN settings, find the Hardware Crypto field and set it to BSD cryptodev engine.
There are other supported cryptographic devices, such as hifn(4) (see Table IPsec Throughput by Cipher ALIX),ubsec(4), and VIA padlock(4). In most cases, if a supported accelerator chip is detected, it will be shown in the System Information widget.
Thermal Sensors DefenseBolt can read temperature data from a few sources to display on the dashboard. If you have a supported CPU, selecting a thermal sensor will load the appropriate driver to read its temperature. Setting this to None will attempt to read the temperature from an ACPI-compliant motherboard sensor instead, if one is present.
The coretemp module supports reading thermal data from Intel core- series CPUs and other modern Intel CPUs using their on-die sensors.
The amdtemp module supports reading thermal data from AMD K8, K10, K11 and other modern AMD CPUs using their on-die sensors.
If you do not have a supported thermal sensor chip in your system, this option will have no effect. Tounload the selected module, set this option to ‘none’ and then reboot.
Note: The coretemp and amdtemp modules report the thermal data from the CPU core itself. This may or may not be indicative of the temperature elsewhere in the system. Case temperatures can vary from place to place. Some motherboards may have multiple sensors that can be read by other programs such as mbmon , though support for those is not in the GUI currently.
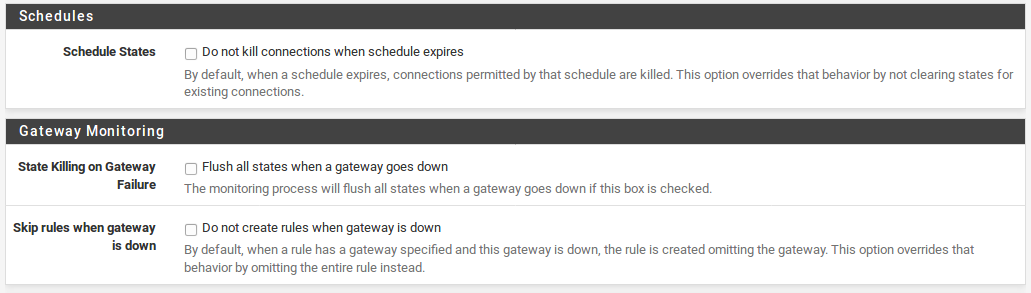
Schedules This option controls whether or not the states are cleared when a scheduled rule transitions into a state that would block traffic. If checked, connections are terminated when the schedule time has expired. If unchecked, connections are left alone and will not be automatically closed by the firewall.
Gateway Monitoring
Clear States When a Gateway is Down
When using Multi-WAN, the monitoring process will flush states for a gateway that goes into a down state. This option overrides that behavior by not clearing states for existing connections, leaving them to timeout on their own or in some cases, continue even if a WAN’s quality is degraded but still usable. More information on how this impacts Multi-WAN can be found in State Killing/Forced Switch.
Skip Rules When Gateway is Down
By default, when a rule has a specific gateway set and this gateway is down, a rule is created and traffic is sent to the default gateway. This option overrides that behavior and the rule is not created when gateway is down, so instead of flowing via the default gateway, the traffic will continue to attempt to use the gateway that is in a down state, and it will most likely not proceed. This is useful if you have traffic that should only ever use one specific WAN and never flow over any other WAN, regardless of how the firewall’s routing table has for the default route.
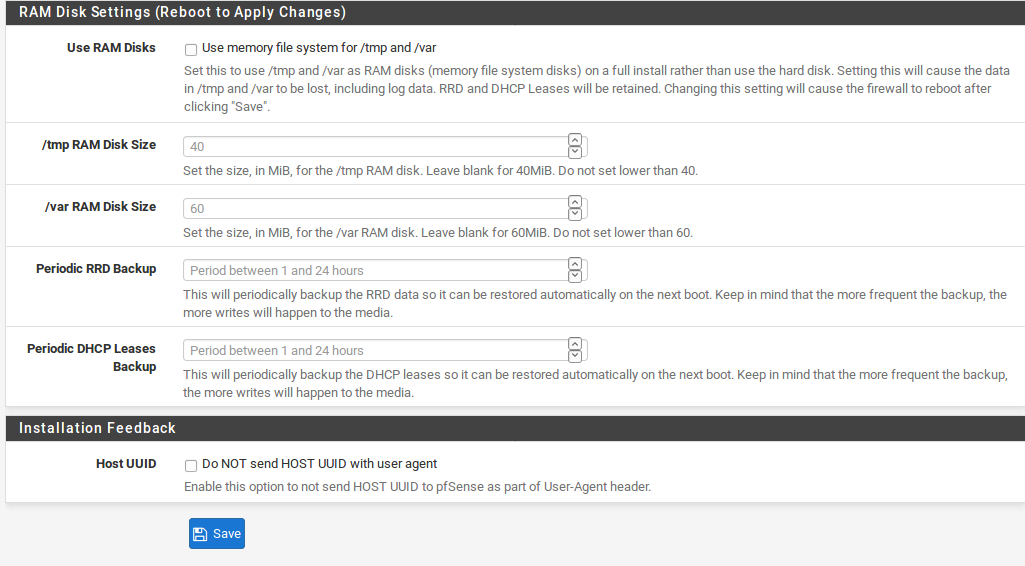
RAM Disk Settings
The /tmp and /var directories are very frequently used for writing files and keeping data that is temporary and/or volatile. On NanoBSD, and formerly embedded, these have always been kept in a RAM disk to reduce the amount of writing that needed to happen on the CF. Today, with the advent of SSDs, users frequently want the best of both worlds: They want to use their larger SSD for more tasks as a full installation, but they are also concerned with frequent disk writes DefenseBolt introduces a new feature that lets a full install of DefenseBolt also use a RAM disk for /tmp and /var, to reduce the amount of writing done to the install disk. This has the benefit of keeping most of the writes off of the disk in the base system, but packages may yet write frequently to the hard drive. To start using a RAM disk, check the option Use memory file system for /tmp and /var, and then enter disk sizes for /tmp and /var.
Caveats/Precautions
There are several things one needs to be cautious about when choosing whether or not to use the RAM disk option on a full install. It is possible to have data loss or other unexpected failures due to the use of this option.
Because the RRD and DHCP lease databases are kept in /var this also means that a full install using this option can lose that data if there is a sudden power loss. Later in this section we discuss how to setup periodic backups of that data.
The system logs are also held in /var but they are not backed up like the RRD and DHCP databases. The logs will reset fresh on each reboot.
Since these are RAM disks, the amount of RAM available to other programs will be reduced by the amountof space used by the RAM disks. For example if you have 1GB of RAM, and set 256MB for /var and 256MB for /tmp, then only 512MB of RAM will be available to the OS for general use.
Special care must be taken when choosing a RAM disk size, more discussion on that will be done in the next section.
RAM Disk Sizes
Setting a size too small for /tmp and /var can backfire, especially when it comes to packages. The suggested sizes on the page are an absolute minimum and often you will want much larger sizes if you have enough RAM. The most common failure is that when you install a package, parts of the package touch places in both /tmp and /var and it can ultimately fill up the RAM disk and cause other data to be lost. Another common failure is setting /var as a RAM disk and then forgetting to move a squid cache to a location outside of /var - if left unchecked, it will fill up the RAM disk.
On ALIX hardware, there is really not enough RAM to tweak these sizes in any meaningful increment. For /tmp, a minimum of 40MB is required. For /var a minimum of 60MB is required. If you need some help determining the size, then you can check the current usage of your /tmp and /var directories before making a switch. Check the usage several times over the course of a couple days so you don’t accidentally catch it at a low point. Watching the usage during a package installation would add another useful data point.
Periodic Data Backups
When using RAM disks, either on NanoBSD or on a full install with the RAM disk option enabled, temporary data that needs written often is kept on a RAM disk and then saved during a normal shutdown or reboot. This data can be lost should you suffer a sudden power loss. The two options in this section, RRD Backup and DHCP Leases backup, let you configure a periodic backup of the RRD graph databases and the DHCP lease database, respectively. You can choose any hourly option between one hour and 24 hours.
Note: The more frequent the backup schedule, the more writes happen to the media, so if you are worried about wearing out the media use a longer term value. However, a longer term value is more likely to lose data in the event of a power loss. Consider how important the data is with respect to your media’s lifetime before enabling these backups.
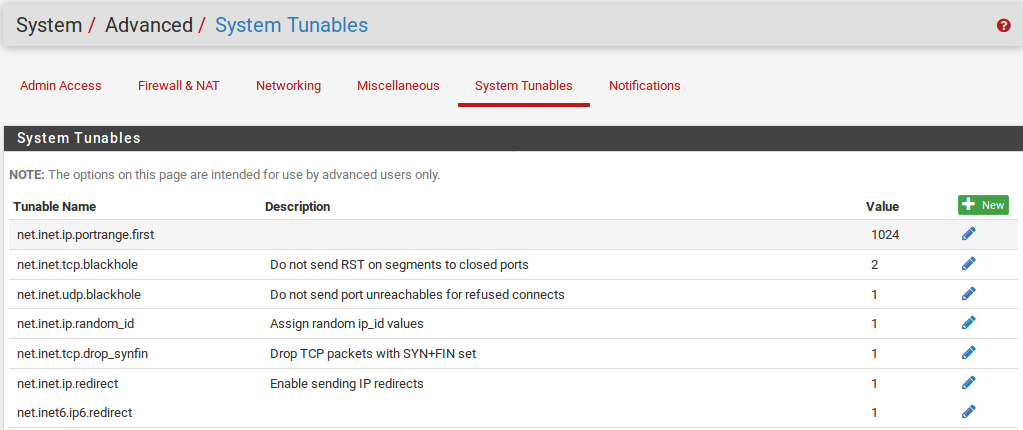
System Tunables Tab
The System Tunables tab provides a means to set run-time FreeBSD system tunables, also known as sysctl OIDs. In almost all cases, these should be left at their defaults. Those familiar with FreeBSD, or doing so under the direction of a developer or support representative, may want to adjust or add values on this page so that they will be set as the system starts.
Note: The values here are distinct from values thatare considered Loader Tunables. Loader Tunables are read-only values once the system has been booted, and to change those values they must be set in /boot/loader.conf.local or /boot/loader.conf.
Notifications
Starting with DefenseBolt the firewall is now capable of sending remote notifications by using Growl or E-mail via SMTP. These notifications are the same notifications that will pop up in the GUI as a scrolling notice in the top area of the page. The exact location and color of the display varies based on the theme.
Growl
Growl provides a fairly unobtrusive method of delivering desktop notifications. These notifications pop up on the desktop and then hide or fade away. Growl is built-in on Mac OSX, and it’s available with additional software on Windows and FreeBSD/Linux (Gnome or KDE).
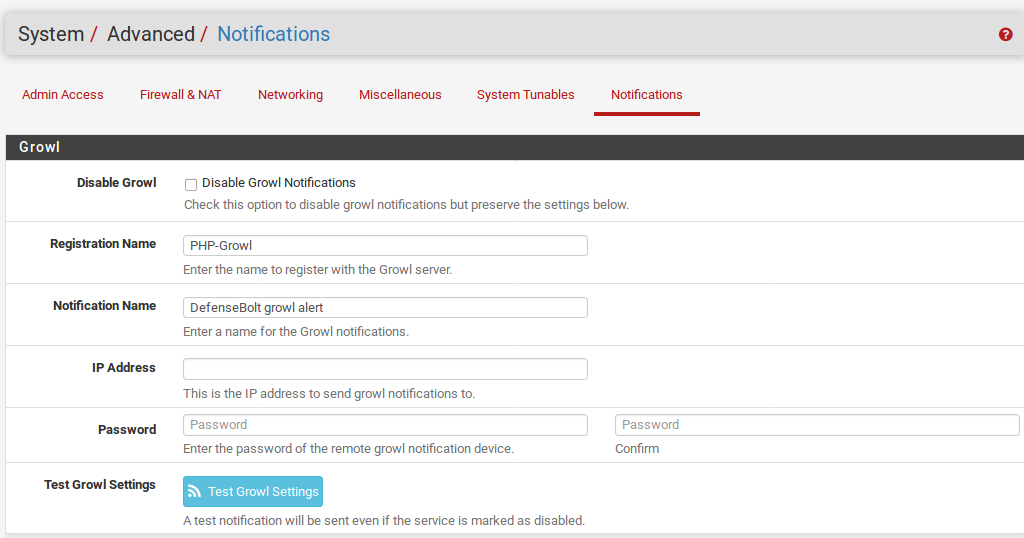
Disable Growl Notifications
When checked, Growl notifications will not be sent, but the settings will be preserved.
Registration Name This is the service name used to register with the Growl server. By default this is PHP-Growl. Consider this as the type of notification, as seen by the Growl server.
Notification Name The name of the system producing the notification. The default value of pfSense growl alert may be sufficient, but you may customize it with the firewall’s hostname or any other value to make it distinct.
IP Address The IP address to which the Growl notifications will be sent.
Password The password required by the Growl server to deliver notifications.
Test Growl The Test Growl button is used to send a test notification via Growl using the current settings.
SMTP E-mail E-mail notifications are delivered by a direct SMTP connection to a server of your choice. The server should either be configured to allow relaying from the firewall, or you may use the configuration options below to provide credentials for SMTP authentication.
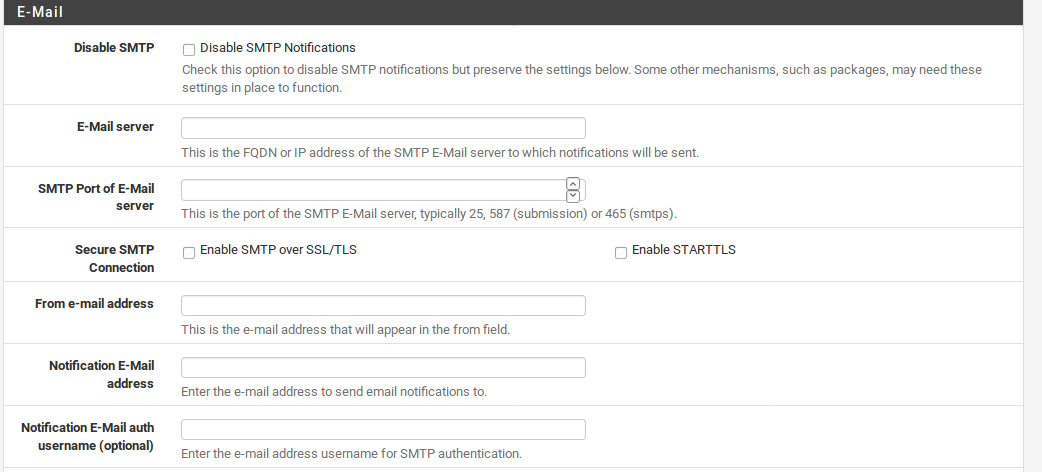
Disable SMTP Notifications When checked, SMTP notifications will not be sent, but the settings will be saved. This is useful if you do not want notifications, but you do need to have the settings in place for a package such as mailreports which can generate periodic reports and send them via e-mail.
E-mail server Place the hostname or IP address of the e-mail server through which the notifications will be sent.
SMTP Port of E-mail server The port to use for communicating with the SMTP server. The most common ports are 25, 587, and 465. In most cases, 25 may work. Some providers block outbound connections to port 25, so using 587 (the Submission port) is preferred if your server supports it. Port 465 is for Secure SMTP (smtps), so using that port will likely also require checking Enable SSL/TLS Authentication. SSL/TLS Authentication may be used on any port if the server supports SSL/TLS, but it is required on port 465.
From e-mail address This is the e-mail address that will be used as the source of the e-mail in the From header. You may set this to a nonexistent e-mail address, or the same as the destination e-mail address, or some other value. Some SMTP servers attempt to validate this address so you may need to use a valid address here if the e-mail will be routed through a strict server.
Notification E-mail address
This is the destination address of the notification e-mail. It can be your own personal address, a general support account, or any other address you want to receive the notifications.
Notification E-Mail auth username If your server requires a username and password for SSL/TLS Authentication, you may enter the username here.
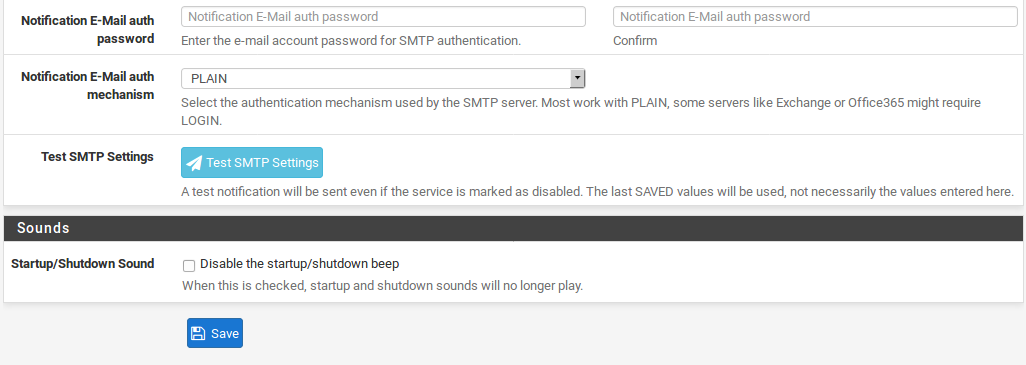
Notification E-Mail auth password If your server requires a username and password for SSL/TLS Authentication, you may enter the password here.
Test SMTP The Test SMTP button will generate a test notification and send it via SMTP using the current settings. Startup/Shutdown Sound If the firewall hardware has a PC speaker, normallyDefenseBolt will play a sound when startup finishes, and again when a shutdown is being initiated. By checking Disable the startup/shutdown beep, these sounds will not be played.