Intercepting HTTPS Traffic Using the Squid Proxy Service in Defensebolt
squid has become one of the most popular packages for DefenseBolt firewalls and it’s not hard to see why.
Squid proxy servers can improve network performance by keeping a local cache of commonly accessed web pages, images and other files. Additionally Squid can monitor traffic and keep a log of which web pages users on your network are viewing.
In order to fully take advantage of the benefits of Squid I recommend taking the time to properly enable HTTPS interception.
This guide assumes you already have a DefenseBolt firewall up and running. If you don’t have one yet you can easily install Defensebolt on an old computer you probably already have on hand.
Why You Should Enable HTTPS Interception in Squid
By default Squid proxy servers cannot monitor encrypted HTTPS traffic. Squid simply establishes a TCP connection to the destination server and responds to the client with an HTTP 200 response to indicate the connection was established.
Once this encrypted tunnel has been established Squid passes the packets between the client and the server but has no longer has any visibility to the traffic since it is protected by SSL encryption.
Over the last few years many popular web sites including Google, Youtube, Reddit and Facebook have started enabling HTTPS encryption by default. This means that without configuring HTTPS interception Squid proxies have limited filtering, monitoring and logging capabilities.
Fortunately Squid supports man in the middle SSL filtering which will allow you to more effectively monitor the traffic passing through the proxy server.

Encrypted HTTPS traffic can be inspected using the SSL interception feature in Squid. | Source
Step 1: Install the Squid3 Package
To get started install the Squid3 package using the DefenseBolt package manager (System Packages).
After locating Squid3 from the package list click the plus button on the right side of the package to start the package installation.
The package manager will automatically download and install the Squid3 PBI.
image 2
Installing the Squid3 package from the DefenseBolt package manager
image 3
Squid3 package installation progress
Step 2: Configure the Squid General Settings
After the Squid package has been installed the general settings must be configured. The settings page can be found in Services Squid Proxy Server.
Configure the following options:
- Enable Squid Proxy - Checked
- Keep Settings/Data - Checked
- Proxy Interface(s) - Select LAN and Loopback
The rest of the settings in the general settings area can be left on the default settings.
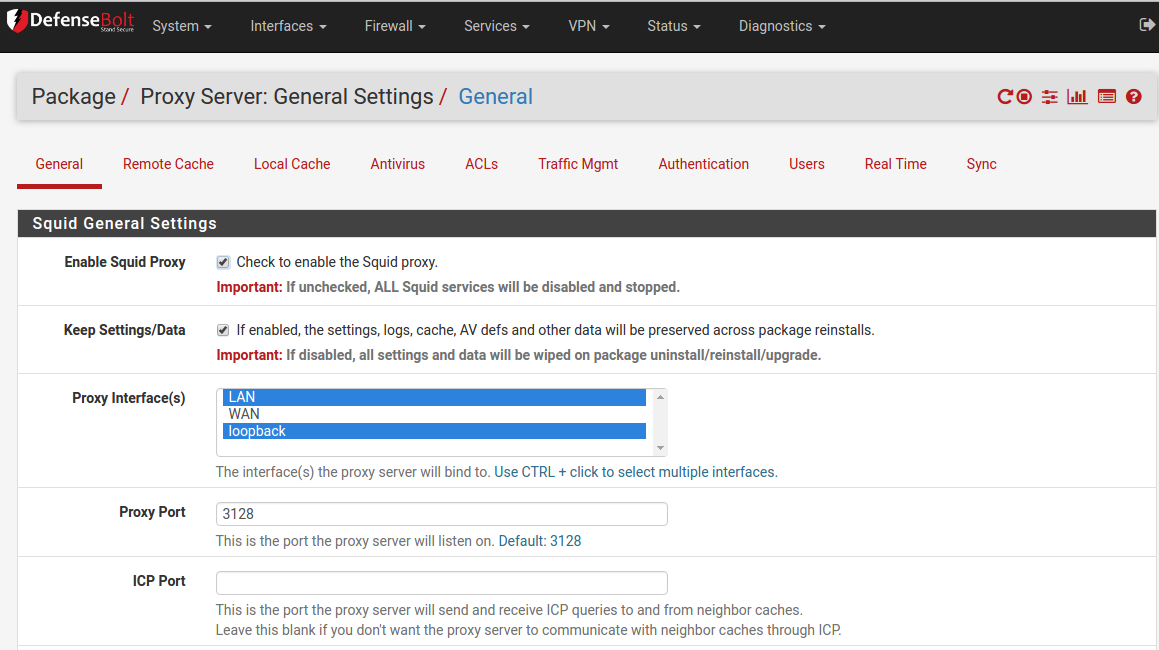
Squid3 General Settings Page in DefenseBolt
Step 3: Configure Transparent Proxy Settings
Just below general settings you’ll find the transparent proxy settings. In most cases you will probably want to enable transparent proxy mode. When this mode is enabled the firewall will automatically redirect all incoming web traffic to the Squid proxy server.
With transparent mode enabled it is not necessary to configure the clients web browser to use the proxy. In most cases the client will not even notice their traffic is passing through the proxy.
To enable the transparent proxy configure the following settings:
- Transparent HTTP Proxy - Checked
- Transparent Proxy Interface(s) - LAN
The rest of the settings in this section can be left on their default settings unless you wish to configure specific addresses to bypass the proxy.
Scroll down to the bottom of the page and click save to apply the settings.
If you decide not to enable transparent mode you will need to configure the web browser settings for each client you wish to specifically use the proxy server.

Squid3 transparent proxy settings in DefenseBolt
At this point you have configured a basic Squid proxy running in transparent mode. Before proceeding further I recommend testing web browsing functionality from a client computer to make sure everything is working normally.
Troubleshoot and resolve any problems with the basic proxy functionality before proceeding to enable SSL interception.
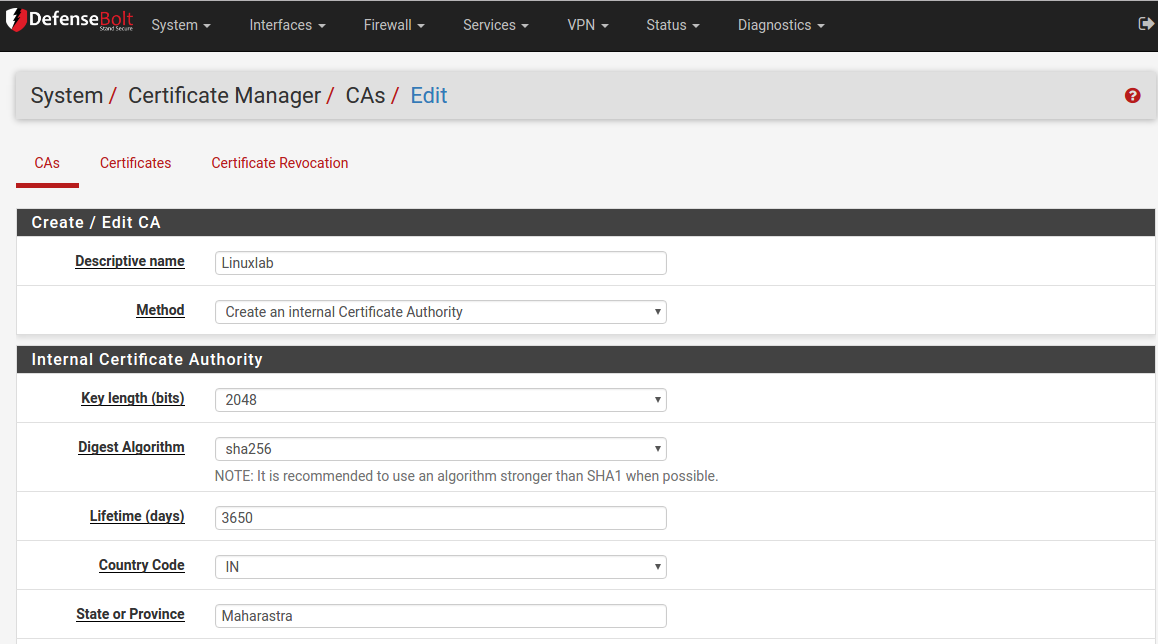
Step 4: Configure a Certificate Authority
A certificate authority must be configured in DfenseBolt before HTTPS interception can be enabled in Squid. The CA will be used to generate new client SSL certificates on the fly for automatically encrypting and decrypting web traffic.
1 .Access the cert manager in the System Cert Manager menu. Click the plus button to create a new certificate authority.
Configure the following settings for the new certificate authority.
- Descriptive Name - Choose a name for your CA. Keep in mind that this will be displayed on the client certificate visible to the clients.
- Method - Select ‘Create an Internal Certificate Authority’ from the dropdown menu.
- Key length - I recommend 2048 for maximum compatibility but you can use 4096 bits for maximum security.
- Digest Algorithm - Use SHA256 or higher. Like the previous setting you need to balance security with device compatibility.
- Lifetime - Set this to 3650 days (10 years)
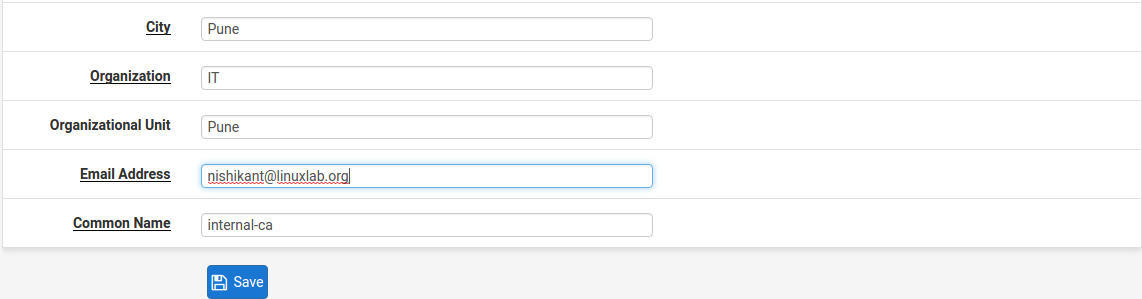
6. Distinguished name - Fill out all of the fields in the section (Country, State, etc). These will all be visible in the certificates seen by the clients. Click the save button to finish creating the CA

Step 5: Export the CA Certificate
After creating the new CA the CA certificate must be exported. This certificate will need to be installed on any client machine that will be using the proxy server.
From the CA manager page click the export CA cert button to download the certificate. This will download a copy of the CA certificate in .crt file format.
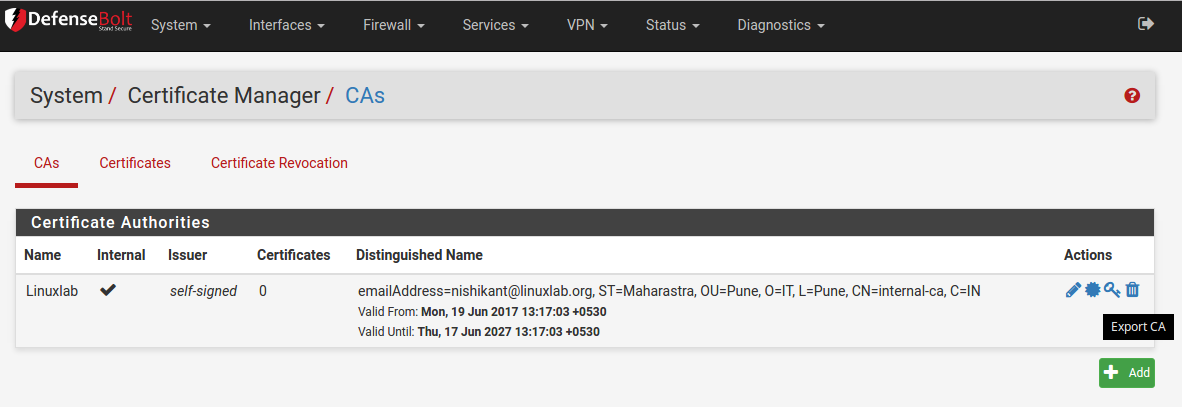
Exporting the CA certificate from the DefenseBolt certificate authority manager.
Step 6: Install the CA Cert to the Client Computers
In order to prevent the web browsers on client computers from showing certificate errors the CA certificate from the DefenseBolt CA must be installed on all client computers that will be using the proxy server.
Skipping this step will result in clients receiving browser security errors and can cause various HTTPS connection problems.
The certificate must be placed in the Trusted Root Certificate Authorities store to prevent browser errors.
If you only have a small number of computers on your network then it will probably be easiest to manually import the certificate on each computer.
For larger networks you should consider setting up Microsoft Active Directory Certificate Services. AD integrated certificate authorities can automatically push out a root certificate to hosts which are members of the domain.
Importing the Certificate on Windows 7
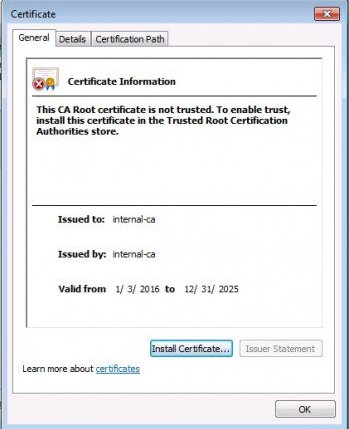
To import the certificate to a computer running Windows 7 double click on the .crt file to open the certificate dialog box.
- Click the install certificate button to start the import wizard.
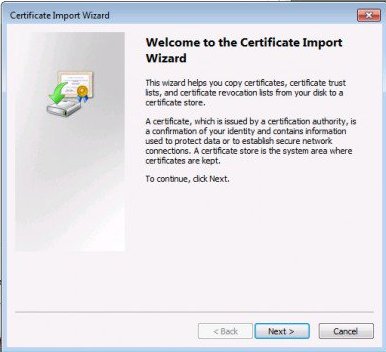
- Click next on the first page of the certificate import wizard.
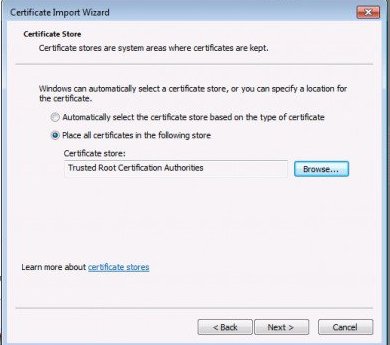
- Select the option place all certificates in the following store.
- Click on the browse button and select Trusted Root Certification Authorities.
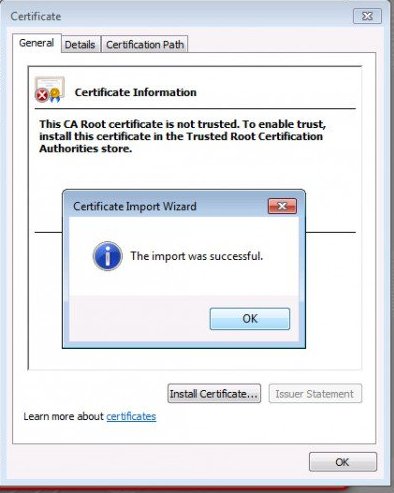
5. Click next, then click finish on the import confirmation page. When prompted click yes to acknowledge the security warning.
You should see a message indicating the certificate import was successfully completed
Importing the Certificate on Mac OS X
Follow the steps below to manually import the certificate on Mac OS X.
- Open the Keychain Access application - Use the spotlight search to easily find this app.
- Click the lock symbol to unlock the key chain for changes.
- Open the File menu and select Import Items.
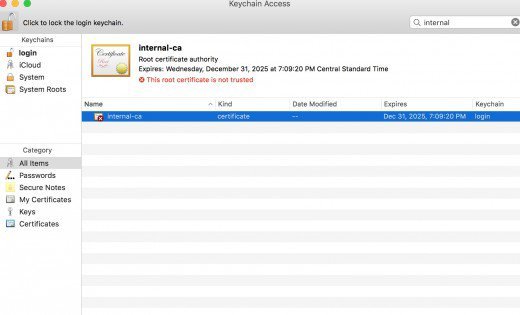
- Select the CA certificate exported from pfSense. (At this point you should see the certificate in the keychain with the message “This root certificate is not trusted”)
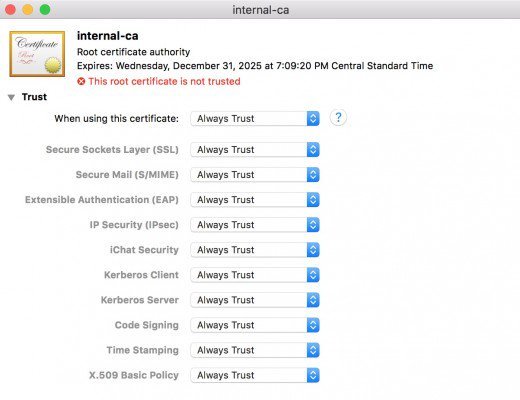
- Double click the certificate and expand the trust section of the dialog box. In the first dropdown box called “When using this certificate” select always trust.
- Close the dialog boxes and exit the keychain access application.
Step 7: Enable SSL Man in the Middle Filtering
After loading the certificate to the client computers you are ready to enable SSL filtering in Squid. Access the squid settings page (Services Squid Proxy Server) and configure the settings below.
- HTTPS/SSL Interception - Checked
- SSL Intercept Interface(s) - Select LAN
- CA - Select the certificate authority created in step 4
Click save at the bottom of the page to apply the settings.
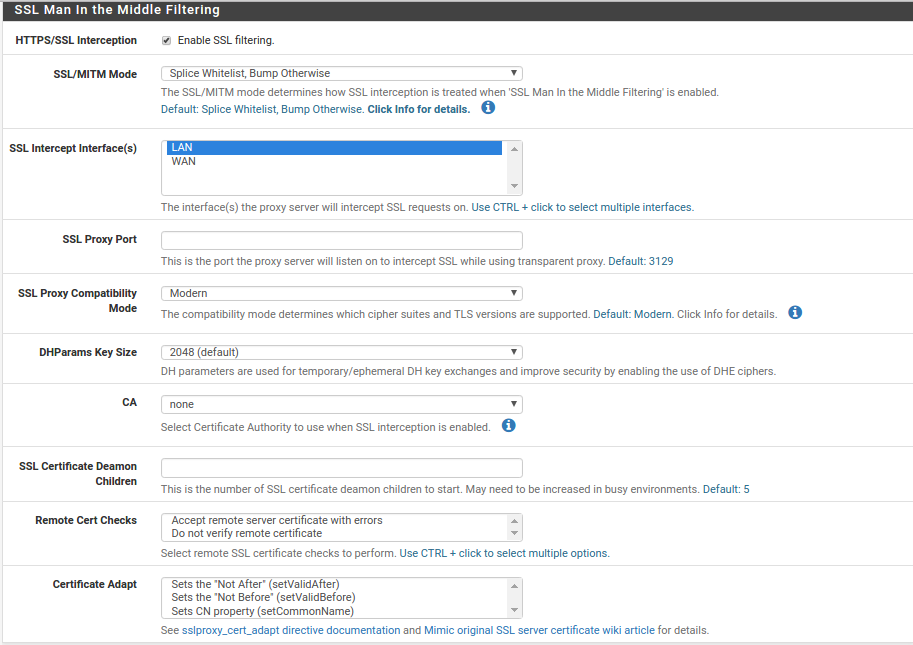
Squid3 SSL man in the middle settings in DefenseBolt
Step 8: Testing SSL Interception
The best practice after enabling SSL interception is to confirm that it is working as intended. Follow these steps to verify HTTPS connections are being decrypted by the proxy.
- Visit a site which uses HTTPS such as Reddit from a client computer behind the proxy.
- View the certificate information presented by the web browser. In Chrome this can be done by clicking the lock symbol on the address bar.
- Confirm the certificate issuer information matches the information you entered when creating the certificate authority in step 4.
image 11
Known Issues in Squid 3.4
The DefenseBolt package manager currently contains Squid version 3.4 which has a known issue where it incorrectly generates SHA1 certificates instead of SHA256.
Since SHA1 is a weak algorithm many browsers will show errors when they encounter certificates signed using this algorithm.
To fix this I recommend manually upgrading to Squid version 3.5.3 which does not have this problem.
Upgrading to Squid 3.5.3
The upgrade instructions are slightly different depending on whether you are running the 32-bit or 64-bit version of DefenseBolt.
To determine which version you have open the DefenseBolt dashboard and check the version section of the system information dashboard widget. If you see AMD64 then follow the 64-bit instructions. If you see i386, then use the 32-bit instructions.
The commands can be run through an SSH terminal, or the web based terminal (Diagnostics Command Prompt)
64-Bit (AMD64) Instructions
Download the PBI by running the command: fetch https://files.pfsense.org/packages/10/All/squid-3.5.3-amd64.pbi
Install the package by running: pbi_add –no-checksig -f squid-3.5.3-amd64.pbi
Run the commands below to create the correct directory structure
cd /usr/pbi/squid-amd64/
rm -rf /usr/pbi/squid-amd64/etc
ln -s /usr/pbi/squid-amd64/local/etc .
ln -s /usr/pbi/squid-amd64/local/lib .
ln -s /usr/pbi/squid-amd64/local/libexec .
ln -s /usr/pbi/squid-amd64/local/share .
ln -s /usr/pbi/squid-amd64/bin sbin
Reboot pfSense after running the above commands (Diagnostics Reboot).
32-Bit (i386) Instructions
- Download the PBI by running the command: fetch https://files.pfsense.org/packages/10/All/squid-3.5.3-i386.pbi
- Install the package by running: pbi_add –no-checksig -f squid-3.5.3-i386.pbi
- Run the commands below to create the correct directory structure
cd /usr/pbi/squid-i386/ rm -rf /usr/pbi/squid-i386/etc
ln -s /usr/pbi/squid-i386/local/etc .
ln -s /usr/pbi/squid-i386/local/lib .
ln -s /usr/pbi/squid-i386/local/libexec .
ln -s /usr/pbi/squid-i386/local/share .
ln -s /usr/pbi/squid-i386/bin sbin
Reboot pfSense after running the above commands (Diagnostics Reboot).
Verifying the Installation of Squid 3.5.3
After rebooting pfSense start a new SSH session (or use the web terminal) to verify the updated package was correctly installed.
When you run the command below you should see version 3.5.3 listed in the output.
/usr/local/sbin/squid -v
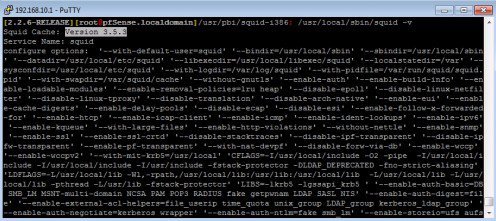
Verify Squid 3.5.3 has been correctly installed.
Completion
Congratulations, if you completed all of the steps above you have successfully configured Squid to intercept encrypted HTTPS traffic. You should immediately notice HTTPS requests being logged in the Squid access logs.
To take full advantage of the new access logs being collected I recommend installing a Squid log analyzer such as Lightsquid.